Tuesday, June 5, 2012

Dal Makhani

I’ve been eating a lot of good food lately but just didn’t get a chance to measure & cook, take pictures or work on recipes. Here’s one recipe after a fun long break. :)

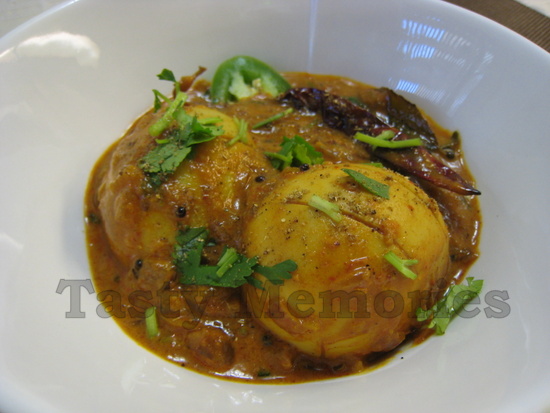
Dal Makhani is a popular Indian dish. It is quite easy to prepare but does require a good amount of time. I came across this recipe on Vahrehvah’s website few years back and have prepared this couple times. The richness of the dish and the amount of time required for cooking, it is definitely not your everyday meal but good for special occasions or get-togethers.  It could be paired with grilled meat or kabobs along with some Naan, Jeera Rice and Kachumber or simply serve with some Jeera Rice or Naan.


Dal Makhani

Serves: 4
Preparation Time: 15 minutes
Dal Soaking Time: 8 hours or more
Cooking Time:  1 hour 30 minutes

Ingredients:
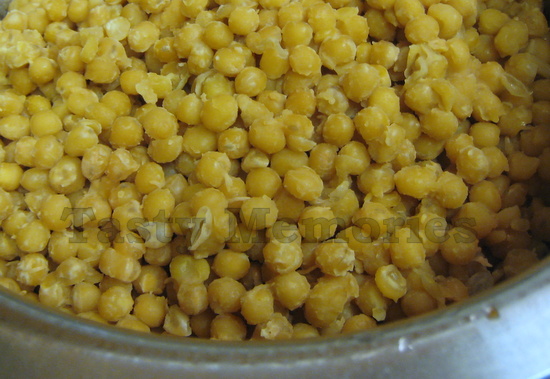
1/2 cup Whole Urad Dal (Black Gram)
1/8 cup  Red Kidney Beans
1 tablespoon Oil
1 teaspoon Cumin Seeds
Whole Spices – 2 Cloves, 2 Cardamom Pods, 1 - 2” Cinnamon Stick, 2 Bay Leaves
2 teaspoons Ginger – grated or finely chopped
2 teaspoons Garlic – crushed or finely chopped
1/2 teaspoon Turmeric Powder
3 to 4 Tomatoes – blend to puree (about 1 3/4 cups)
3 teaspoons Red Chili Powder – adjust to taste
1 teaspoon Coriander Powder
Salt to taste
3 tablespoons Butter
1/2 tablespoon Dry Fenugreek Leaves
1/4 cup Heavy Whipping Cream
2 tablespoons Cilantro – finely chopped

Direction:
  1. Wash Urad Dal and Kidney Beans few times and soak with about 8 cups of water for 8 hours or overnight.
  2. Rinse once and cook in pressure cooker with 3 or more cups of water on medium heat for 4 whistles (or about 7 minutes after cooker starts steaming).
  3. Turn off heat and keep aside until all steam has been released, for about 10 to 15 minutes.  The beans should be very soft and little meshed up. Keep this aside.
  4. Heat oil in a pot over medium high heat and add cumin seeds.
  5. When it starts to splatter, add whole spices.
  6. After 30 seconds or so, add ginger, garlic, turmeric powder and cook for 30 more seconds.
  7. Add tomato puree and bring it to a boil.
  8. Add chili powder, coriander powder, and salt. Cover and cook for 5 minutes on medium heat.
  9. Add butter and cook for 2 more minutes.
  10. If there's any liquid left from boiling the beans, add that liquid or just some water and bring to a boil.
  11. Add the cooked beans and mix well.
  12. Add dry fenugreek leaves, crushing them with hand while adding.
  13. Once the beans start to boil, reduce heat to low, cover the lid and cook for 40 minutes or more stirring occasionally in between so that the beans do not get stuck at the bottom. Cook until it is a good thick gravy consistency.
  14. Add cream, mix well and cook covered for further 5 minutes on low heat.
  15. Garnish with chopped cilantro and serve with Naan or Zeera Rice and Kachumber.
Note: To cook Dal without pressure cooker, cook uncovered over medium to low heat, stirring occasionally to make sure it is not scorching at the bottom of the pot. Cook for about 1 hour or until dal is tender adding more water as required.

Print this recipe >>

Thursday, May 17, 2012

Eggless Ricotta Cheesecake

I’ve been searching for some eggless cake recipes for my Mother-in-law’s birthday. Since she doesn’t eat eggs, I thought it would be a good idea to make her a special homemade cake. I wanted some simple recipe that doesn’t use any egg substitutes or special ingredients that are hard to find. While not having much luck or time with finding one that I would like to make, an image of a very beautiful cake popped in my head. I remember seeing a cake recipe in ‘Great Vegetarian Dishes’ by Kurma Dasa but never really thought of making it. Since the occasion calls for it, I thought I’ll give it a try and see how it turns out.

It is a basic cheesecake with Ricotta Cheese addition which makes the cake little crumbly but still tastes pretty rich. Topping it up with whipped cream and fresh fruits makes it extra special. I made crust using Graham crackers instead of following the recipe and also made glaze to go on top of the fruits. I’ve also changed the ratio of ingredients used in the filling. This is mainly because original recipe was in Grams and when I convert it into Ounces; I was not able to get exact measurements in standard supermarket packages. Since I didn’t want to buy extra ingredients or have any leftovers, I decided to tweak it a bit. It did turn out quite beautiful and tasty.  I do have to admit though that I’m really not crazy about Cheesecakes but Birthday Girl seemed to love it.


Eggless Ricotta Cheesecake

Makes: one 9 inch Cheesecake
Preparation Time: 30 minutes
Baking Time: 1 hour 15 minutes or more
Chilling Time: 24 hours

Ingredients:
Crust Filling
1 1/2 cups Graham Cracker Crumbs
1/4 cup Butter - Melted

Topping
2/3 cup Heavy Whipping Cream
1 tablespoon Granulated White Sugar
1 teaspoon Pure Vanilla Essence
Fresh Fruits of your choice
Fruit Glaze (optional) – recipe follows

16 ounces Cream Cheese – room temperature
15 ounces Ricotta Cheese
1 1/3 cups Granulated White Sugar
1 Lemon Zest
1/3 cup freshly squeezed Lemon Juice
1 tablespoon Corn Flour
1 1/3 cup Heavy Whipping Cream
1 1/2 teaspoons Pure Vanilla Essence


Directions:
  1. Preheat oven to 350 degrees Fahrenheit.
  2. Spray with oil or butter a 9 inch round springform pan and keep aside.
Crust
  1. In a bowl, combine Graham cracker crumbs, butter and mix with a fork or hand until well combined.
  2. Spread the crumbs evenly over the prepared pan and press it well to form a crust. Keep this refrigerated while preparing filling.
Filling
  1. Place all filling ingredients in a large bowl and beat until light and fluffy without over mixing it.
  2. Pour this over the prepared pan with crust.
  3. Bake in the middle rack of the preheated oven for about 1 hour 15 minutes or until lightly golden brown on top. (It took me about 1 hour 40 minutes)The cake is done when the entire surface is golden brown.
  4. Remove from oven and let the pan cool over wire rack. Once completely cool, cover with plastic wrap and refrigerate for 20 to 24 hours before serving.
Topping
  1. Place heavy whipping cream along with sugar & vanilla essence in a well chilled large bowl and beat with whisk attachment until soft peak forms. Add more sugar if desired and continue beating just until stiff peak forms. Use this right away.
  2. Run a thin knife alongside the pan of chilled cheesecake before releasing the spring. Top it up with whipped cream, fresh fruits and brush the fruits with glaze, if desired.
Fruit Glaze – recipe adapted from bakingproject.com
Ingredients:
1 tablespoon Light Brown Sugar
3 tablespoons Light Corn Syrup
1 tablespoon Water

Directions:
Mix all ingredients in a small sauce pan and heat over medium heat for few minutes stirring frequently until slightly thicken. Remove from heat and let it cool completely.

Print this recipe >>

Thursday, May 10, 2012

Bibimbap

Bibimbap is one of my favorite Korean dishes (I know, I have too many favorites :) ). In Korean restaurants, it is usually served in a stone pot/bowl where the rice at the bottom sticks to the stone and creates a crunchy layer. Since I don’t have a stone bowl at home, I usually prepare it just in a regular bowl. As much as I like the crunchy part, for some reason, I think that the homemade Bibimbap tastes much better than the restaurant one. I think one of the reasons the homemade one tastes so good is because I’ve found a really good recipe here. I like to add lots of hot pepper paste, mix it really well and eat.


Bibimbap

Serves: 4
Preparation Time:  30 minutes
Cooking Time: 20 minutes

Ingredients:
1 batch Spinach Side Dish (recipe here)
1 batch Soybean Sprouts Side Dish (recipe here)
1 medium Zucchini – cut into matchstick size pieces (about 10 ounces)
1 medium Carrot – cut into matchstick size pieces (about 5 ounces)
10 Shitake Mushrooms – thinly sliced (if using dried, soak in warm water for 15 minutes until soft)
14 ounces Ground Meat (I used ground Turkey)
4 Eggs
4 cups Cooked Rice
Korean Hot Pepper Paste (Gochujang) – to taste

Prepared ingredients in a platter
Seasoning:
A pinch of Salt
5 teaspoons Oil
6 1/2 teaspoons Soy Sauce (adjust to taste)
2 1/2 teaspoons Sugar
1 1/2 teaspoons Sesame Oil + plus more for serving
4 cloves Garlic – crushed or finely chopped
Freshly ground Black Pepper – to taste

Directions:
  1. In a large platter, place prepared Spinach and Soybean Sprouts.
  2. In a bowl, place Zucchini and sprinkle a pinch of salt. Mix well and keep for about 5 minutes. Squeeze out water and keep aside.
  3. Heat a large skillet over high heat. Once hot, add 1 tsp of oil and sauté Zucchini for few minutes until translucent and transfer to the platter.
  4. In the same skillet, add 1 tsp of oil and sauté Carrots for about 30 seconds and transfer to the platter.
  5. In the same skillet, add 2 tsp of oil and sauté Mushrooms for few minutes until lightly browned. Add 2 tsp soy sauce, 1 tsp sugar and cook for further minute. Add 1/2 tsp of sesame oil, stir well and transfer to the platter.
  6. In the same skillet, add 1 tsp of oil, add Ground Meat and cook until lightly browned stirring frequently. Add 4 cloves garlic, 4 ½ tsp soy sauce, 1 ½ tsp sugar, 1 tsp sesame oil & black pepper to taste and continue cooking for further minute. Transfer this to the platter.
  7. Cook the eggs sunny side up and keep aside.
How to Serve:
  1. Place rice in a large bowl and top it up with prepared meat and vegetables attractively.  Place egg in the center and serve with sesame oil and hot pepper paste on the side.
  2. Before eating, add few drizzle of sesame oil to the bowl along with desired amount of hot pepper paste. Mix really well with a spoon for few minutes and eat.
Print this recipe >>

Spinach Side Dish (Sigeumchi Namul)

This is another one of my favorite Korean side dishes. It is so simple to prepare yet quite tasty. Recipe adapted from Maangchi.com.


Spinach Side Dish (Sigeumchi Namul)

Serves: 4 (as a Side Dish)
Preparation Time:  5 minutes
Cooking Time: 10 minutes

Ingredients:
1 bunch Fresh Spinach (about 1 pound) – cut off the roots
1 teaspoon Salt
2 cloves Garlic – crushed or finely chopped
1 Green Onion – thinly sliced
1 tablespoon Soy Sauce
1/2 tablespoon Sesame Oil
1/2 tablespoon Toasted Sesame Seeds for garnish

Directions:
  1. Bring a pot of water to a boil and add 1 teaspoon of Salt. Add spinach and blanch just until wilted for about 30 seconds.
  2. Drain and rinse under cold water a few times, removing any grit or dead leaves along the way. Squeeze out excess water and cut into about 2 inch pieces.
  3. Add remaining ingredients except sesame seeds and mix it well by hand.
  4. Transfer to a serving plate and garnish with toasted sesame seeds to serve.
Print this recipe >>

Tuesday, May 8, 2012

Soybean Sprout Side Dish

One of the reasons I like eating in Korean restaurants is the variety of side dishes they serve with the meal. I used to prepare 5 to 6 side dishes at a time whenever we do Galbi but haven’t prepared that many dishes at a time for a while now. This is one side dish that is easy to prepare and can also be used as an ingredient for Bibimbap. Recipe adapted from Maangchi’s website.


Soybean Sprout Side Dish

Serves: 4
Preparation Time: 5 minutes
Cooking Time: 15 to 20 minutes

Ingredients:
1 pound Soybean Sprouts – rinsed and drained
1 teaspoon Salt
2 cloves Garlic – crushed or finely chopped
2 Green Onions – thinly sliced
1 tablespoon Soy Sauce
1/2 teaspoon Sugar
1/2 tablespoon Sesame Oil
1 teaspoon Korean Hot Pepper Flakes (optional)

Directions:
  1. Place soybean sprouts, salt and 1 cup water in a pot. Cover and bring it to a boil over high heat.
  2. Reduce heat to medium and cook covered for 15 to 20 minutes until tender.
  3. Drain and transfer to a bowl and keep aside for few minutes to cool down a little.
  4. Add remaining ingredients, mix well and serve.
Print this recipe >>

Monday, May 7, 2012

Curry Udon

Whenever I cook Japanese Curry, I like to serve it with flavored rice for one meal and use the leftovers to make the soup and serve with Udon. I love soups and this is one of my favorite ways to eat Udon. Udon is a thick noodle, mainly made of flour and has a chewy texture which sets it apart from other types of noodles. I usually buy the frozen kind so that I have it handy whenever I need them.

For the soup base, I usually like to make Kombu Dashi (Kelp Stock) and add curry and bring it to a boil but if I’m out of Kelp then I would just use water to make the soup.


Curry Udon

Serves: 1
Preparation Time: 20 minutes
Cooking Time: 15 minutes

Ingredients:
1 – 3 inch piece of Kombu (Dried Kelp) – wiped clean with damp cloth
1 1/2 cups Water
1 1/2 cups prepared Curry (recipe here)
Salt to taste (optional)
1 serving of Udon – cooked per package instructions
1 Green Onion – thinly sliced or shredded

Directions:
  1. In a pot, place Kombu and water and let sit for about 15 minutes.
  2. Bring water to a boil and just before boiling, remove Kombu and discard.
  3. Add Curry to the water, stir and bring it to a boil. Add salt if desired.
  4. In a bowl, place Udon and pour the soup over. Garnish with green onions and serve hot.
Print this recipe >>

Friday, May 4, 2012

Japanese Curry with Chicken

Japanese Curry is quite different from the Indian Curries. It is quite mild compared to Indian Curries but I like both of them. It does taste better when cooked with beef but when you’re short with time, chicken is a good option. It is quick and easy to prepare as I’m using the readymade curry spice cubes (Java Curry Sauce Mix). I usually like to serve this with Curry flavored rice (recipe here) wrapped in an omelet and pour the curry sauce over the egg wrapped rice.


Japanese Curry with Chicken

Serves: 4
Preparation Time: 10 minutes
Cooking Time: 30 minutes

Ingredients:
14 ounces Boneless Skinless Chicken Breast – cut into bite size pieces
Black Pepper to taste
1/2 tablespoon Oil
1 large clove Garlic – finely chopped
1/2 box of Japanese Curry Sauce Mix (about 4 ounces)
1/2 large Onion – cut into 1/2 inch cubes
2 medium Potatoes – cut into 1/2 inch cubes
1 large Carrot – cut into 1/2 inch cubes
1/2 Sweet Apple or Asian Pear – peeled and grated
1 to 1 1/2 tablespoons Honey (adjust to taste)

Directions:
  1. In a bowl, combine chicken pieces with black pepper and keep aside.
  2. Heat oil in a pot over high heat and once hot, add garlic and sauté for few seconds.
  3. Add chicken and sauté for few minutes until lightly browned. Add about 1 tablespoon worth of Curry Sauce Mix to the pot and stir till dissolved.
  4. Add onion, potatoes, & carrots and continue cooking for further minute.
  5. Add 2 cups of water, cover the pot and bring it to a boil.
  6. Once it comes to a boil, reduce heat to low and let it simmer covered for about 10 minutes or until vegetables are tender.
  7. Add the remaining Curry Sauce Mix and stir well until it is all dissolved.
  8. Add apple and honey and let simmer over low heat for about 8 minutes until the sauce has thicken and chicken & vegetables are cooked through.
  9. Serve hot with steamed rice or curry flavored rice.
Note:
  • To make wrapped omelet, use about 2 large eggs per omelet, season with salt & pepper and 1 teaspoon of milk or cream. Cook just until the egg is set but little wet. Fill rice in middle of omelet, wrap and serve with prepared curry sauce.
  • If I’m making Curry Flavored Rice the same day, I keep one cube of Curry Sauce Mix for the rice and use the remaining for Curry Sauce. 
Print this recipe >>

Thursday, May 3, 2012

Curry Flavored Rice

This is a simple rice dish that I usually prepare when I cook Japanese Curry (recipe here). It is easy to prepare and taste particularly good when wrapped in an omelet.


Curry Flavored Rice


Serves: 2 to 4
Preparation Time: 5 minutes
Cooking Time: 25 minutes

Ingredients:
1 tablespoon Butter or Oil
1 large Shallot – finely chopped
1 large clove Garlic – finely chopped
1 cup Rice – rinsed and drained (I use Basmati Rice)
1 cube of Japanese Curry Sauce Mix
2 cups Water or Stock
A small pinch of Salt

Directions:
  1. Heat a pot over high heat and add butter. Once melted, add shallot & garlic and sauté for few minutes until lightly golden in color.
  2. Add rice and sauté for about a minute. Add salt, Curry Sauce Mix and stir till dissolved by adding little water if required.
  3. Add water and bring it to a boil. Reduce heat to very low, cover pot with a tight lid and cook undisturbed for 20 minutes.
  4. Fluff up the rice with a fork, remove from heat and serve.
Note:
  • If using stock, you might not need to add salt.
  • To make wrapped omelet, use about 2 large eggs per omelet, season with salt & pepper and 1 teaspoon of milk or cream. Cook just until the egg is set but little wet. Fill rice in middle of omelet, wrap and serve with prepared curry sauce.
Print this recipe >>

Tuesday, May 1, 2012

Fried Beef (Ame Pyot Kyaw)

This is the type of fried beef we grew up eating. It is similar to the Crispy Fried Chicken I've posted in the past where you boil or cook the meat first before frying. It is quite simple to prepare but since it needs to be cooked until beef is very tender, it will take longer time to cook than chicken. I usually use pressure cooker for preparing this. You can adjust the crispiness of the meat during the frying process. The longer you fry the crispier but little harder it will get. Some people like to fry just for few minutes until golden brown so that it is soft and tender. I personally like it quite crispy and almost ‘Jerky’ like so I fry for longer time, which also makes the meat darker in color. Back home, after deep frying the beef, we like to keep the meat in the oil that was used for deep frying and served it that way but I usually drained the oil after frying.

This can be served with Dal, Achin Hin or Eli Palat along with steamed rice.


Fried Beef

Serves: 4
Preparation Time: 5 minutes
Cooking Time: 40 to 45 minutes

Ingredients:
2 pounds Beef (I used Beef Stew Meat) – cut into 2 x 1 inch pieces
2 tablespoons Ginger – grated or finely chopped
2 tablespoons Garlic – crushed or finely chopped
4 tablespoons White Vinegar
3/4 teaspoon Turmeric Powder
Salt to taste
Oil for frying

Directions:
  1. In a pressure cooker pot, combine beef with ginger, garlic, vinegar, turmeric powder, salt and 1/4 cup of water.
  2. Pressure cook over low heat for 3 whistles or 3 to 4 minutes after cooker starts steaming, turn off heat and keep aside.
  3. Once pressure is released, open the pot and if there is any water left, cook over high heat until all water has been evaporated.
  4. Deep fry the beef over medium heat until desired crispiness.
  5. Serve hot or at room temperature.
Note: If cooking without pressure cooker, fill enough water to barely cover the beef and cook covered over low heat until beef is tender for about 1 hour. Once tender, open lid and cook over high heat to let water evaporate.

Print this recipe >>

Saturday, April 28, 2012

Clay Pot Chicken Rice (Without Clay Pot)

Clay pot chicken rice is one of my favorite dishes that I used to eat while living in Malaysia. This recipe is from a mini cookbook, “Malaysian Favourites” by Wendy Hutton. Since I don’t have a clay pot, I’m using a regular pot to make this. With clay pot, you’ll be able to get the crunchy rice that sticks to the bottom of the pot, good presentation and overall a good experience to eat out of the pot. However, it works out pretty well without it as well.

It is quite simple to prepare as it is a one pot meal. The original recipe uses some Chinese sausage and chest nuts but since the version I used to eat didn’t have these ingredients, I left them out. I also remember eating Shitake mushrooms in the dish so I added them as I love mushrooms. Other than that, I followed the recipe as written and served with some soy and fish sauce with fresh chilies on the side.

Recipe updated: Apr 30, 2012
Amount of Chicken, Rice and Water has been updated.


Clay Pot Chicken Rice (Without Clay Pot)

Serves: 4
Preparation Time: 15 minutes
Marinating Time: 20 minutes
Cooking Time: 40 minutes

Ingredients:
For Marinate
8 ounces Boneless Skinless Chicken – cut into bite size pieces
1 tablespoon Dark Soy Sauce
1 tablespoon Oyster Sauce
1 tablespoon Rice Wine (Chinese Cooking Wine)
1 teaspoon Sugar
1 teaspoon Sesame Oil
1/2 teaspoon Corn Flour/Corn Starch

Other Ingredients
6 Dried Shitake Mushrooms – soaked in warm water for 20 minutes to soften, discard stems and cut in quarters
2 tablespoons Oil
1 cup Rice – washed and drained (I use Basmati Rice)
1 1/2 tablespoons Ginger – finely shredded
2 tablespoons Fried Shallots (I use store bought readymade fried shallots)
2 Green Onions – thinly sliced
2 tablespoons Roasted Peanuts (optional)

Directions:
  1. In a bowl, combine chicken with all marinate ingredients and keep aside for 20 minutes.
  2. Heat oil in a pot over medium high heat, add rice, stir and cook for about 1 minute.
  3. Add 1 3/4 cups or enough water to cover rice by about 3/4 inches, increase heat to high and let cook uncovered until water is partially absorbed and “craters” or “holes” start appear in the surface of the rice, for about 5 minutes.
  4. Add ginger, marinated chicken, mushrooms and stir once. Reduce heat to low, cover and cook undisturbed for 20 minutes.
  5. After 20 minutes, fluff the rice with fork. If there is still water left and chicken it not cooked through, cover and continue cooking over low heat until all water is absorbed and chicken is cooked through.
  6. Garnish with fried shallot, green onions and roasted peanuts before serving.
  7. Serve with either sliced Red Chilies with Soy Sauce or sliced Thai Chilies with Fish Sauce.
Print this recipe >>

Thursday, April 26, 2012

Grilled Vegetables with Warm Jalapeno Dressing

I was searching for some simple and delicious salad recipes but nothing was catching my attention. I turned to my sister for some ideas and she sent me few recipes to try out. This recipe is from 'Curry and Chilli Cookbook (Step by Step Cookery) by Staff of Murdoch Books. It uses warm dressing with grilled vegetables. We've always made assorted grilled vegetables and I've always loved them so this recipe sounds good to me. The dressing has a very good balance of flavors and you can add as much variety of vegetables as you like. I seasoned my vegetables before grilling but followed the dressing recipe to exact.


Grilled Vegetables with Warm Jalapeno Dressing

Serves: 4
Preparation Time: 15 minutes
Cooking Time: 20 minutes

Ingredients:
For Vegetables
1 medium Zucchini - cut diagonally into 1/4 inch slices
1 medium Eggplant -cut diagonally into 1/4 inch slices
1 Red Bell Pepper - cut into 1/4 inch rings
1 Green Bell Pepper - cut into 1/4 inch rings
2 Tomatoes - cut into 1/2 inch slices
1 Large Onion - cut into 1/4 inch rings
2 Green Onions 
Olive Oil as needed
Salt and Pepper to taste
*Note: To grill vegetables in bamboo skewers, cut them into thicker or bite size pieces.

For Dressing
3 tablespoons Extra Virgin Olive Oil
2 cloves Garlic - crushed or finely chopped
1 tablespoon Jalapeno - finely chopped
1/2 teaspoon Crushed Red Pepper (adjust to taste)
1 teaspoon Sugar
2 tablespoons freshly squeezed Lemon Juice
1 tablespoon Parsley - chopped
1/4 teaspoon Salt
Freshly cracked Black Pepper

Directions:
For Vegetables

  1. Lightly brush vegetables with olive oil and season with salt and pepper to taste on both sides.
  2. Heat indoor griddled pan or outdoor grill until very hot and grill the vegetables until soften but with a 'bite'.
  3. Arrange vegetables in a platter and keep aside.
For Dressing:
  1. In a small sauce pan over low heat, cook olive oil, garlic, jalapeno and crushed red pepper for few minutes until garlic and jalapeno has soften.
  2. Add sugar, lemon juice and let it heat through.
  3. Add parsley and salt, and pour the dressing over warm vegetables.
  4. Season generously with cracked black pepper and serve warm. 
Print this recipe >>

Wednesday, April 25, 2012

Dum Ka Champ

There's a little confusing but fun story behind this dish. For few years now, my Dad has been telling us that his favorite dish is Tawa Boti. When he finally got to eat it, he realized that Tawa Boti was not the dish he was missing but couldn't recall the dish he likes. After having a conversation between me, him and my sister; my sister thinks that this might be the dish he is missing.

It is very similar to the Tawa Boti recipe I posted earlier, mainly with the ingredients used. The taste of the gravy is quite similar as well. The difference is that this dish uses ground meat, has potatoes and cooking method is different from Tawa Boti.

We all have long forgotten about this dish for many years but since after that conversation, I've been craving for this. We're not even sure of the real name for this dish but my sister vaguely remembers it as Dum Ka Champ (or Kabab). She told me how to prepare it so that I can test it out.

Since my Dad's Birthday is coming up, I thought of dedicating this dish for him.
"Happy Birthday Daddy:)"...


Dum Ka champ

Serves: 4
Preparation Time: 30 minutes
Cooking Time: 45 minutes

Ingredients:
For Patties For Gravy
2 teaspoons Cumin Seeds
2 inch piece Ginger - cut in chunks
5 cloves Garlic - cut in chunks
4 Thai Chilies or any Green Chili - cut in chunks
1/4 cup Onion - roughly chopped
2 tablespoons Fried Onions (I use store bought)
20 ounces Ground Beef (I used extra lean)
Salt to taste
1/4 teaspoon Turmeric Powder
1 teaspoon Garam Masala Powder
1/2 teaspoon Cumin Powder (optional)
1 Large Egg - lightly beaten
3 tablespoons Oil
1/2 cup Yogurt
1 teaspoon Garam Masala Powder
2 teaspoons Red Chili Powder
1/4 teaspoon Turmeric Powder
1/2 teaspoon Salt (adjust to taste)
2 Russet Potatoes - cut into 1/4 inch rounds
1 large Onion - cut into 1/4 inch rounds
2 medium Tomatoes - cut into 1/4 inch rounds
1/3 cup Mint Leaves - roughly chopped
1/4 cup Cilantro - roughly chopped (optional)
2 Thai Chilies - cut in half lengthwise


Directions:
For Patties
  1. In food processor, pulse cumin seeds few times to crush them a bit. Add ginger, garlic, Thai chili and process until very finely chopped. Transfer to a bowl and keep aside.
  2. In same food processor, add onion and grind until very finely chopped. Transfer to the bowl with ginger, garlic and chili.
  3. Add remaining patties' ingredients except egg and oil to the bowl and mix well with hand. (I pulse the meat mixture few times in the food processor after mixing with hand)
  4. Divide the meat mixture into 8 equal portions and shape each portion into patties about 3 inches wide and 1/2 inches thick.
  5. Heat a large pan with oil over medium heat. Once hot, lightly coat the meat patties with beaten egg and pan fry till lightly golden for about 3 to 4 minutes per side, flipping once. Remove from oil and keep aside.
For Gravy
  1. In a small bowl, combine Yogurt with 1/2 cup of water, red chili powder, turmeric powder and salt. Whisk well to smooth it out.
  2. In the same pan used above, wipe out some oil leaving a thin layer coating at the bottom.
  3. Place each ingredient in the pan in a single layer with few tablespoons of yogurt between each layer, starting with potatoes at the bottom, meat patties, onion rings, and finally tomatoes on top.
  4. Pour remaining yogurt mixture over the top, cover with a tight lid and cook over low heat for about 30 minutes undisturbed.
  5. After 30 minutes, check to see if potatoes are tender. If there is too much water, increase heat to medium and let it evaporate partially covered or uncovered for about 5 minutes. (Keep in mind that potatoes will soak up water later so don't over evaporate it)
  6. Once you've reached the desired consistency of liquid and potatoes are cooked through, top it up with mint, cilantro and Thai chilies. Let sit covered for about 5 minutes before serving.
  7. Serve hot with Chapati or Naan.
Print this recipe >>

Tuesday, April 24, 2012

Naan Pizza


Naan Pizzas are easy and quick to prepare and is delicious. One lazy evening, I didn't feel like cooking and we were totally out of fresh vegetables at home. The only thing I had on hand was some frozen Naan, sun dried tomatoes, olives and cheese. So we decided to just make Naan Pizza out of it. Since I didn’t have any marinara or pesto sauce on hand, I decided to spread some mayonnaise on it. It just took few minutes to put together and came out quite satisfying so we have been making this every now and then. This is not exactly a recipe but I thought I'll share since we like it a lot.


Naan Pizza

Makes: 4
Preparation Time: 10 minutes
Baking Time: 10 minutes

Ingredients:
4 Frozen Garlic Naan
4 teaspoons Mayonnaise
1/3 cup Kalamata Olives – thinly sliced
1/2 cup Sun Dried Tomatoes in Oil – sliced
1 – 4 ounce cup Pineapple Tidbits in 100% Juice - drained
1/2 cup Extra Sharp Cheddar or Cheese of your choice – grated
1 tablespoon Cilantro – roughly chopped (optional)

Directions:
  1. Preheat oven to 450 degrees Fahrenheit.
  2. Spread 4 frozen Naans in a microwave safe plate and microwave for about 1 minute.
  3. Spread 1 teaspoon of mayonnaise on each of the Naan.
  4. Top it up with remaining ingredients among 4 Naans.
  5. Bake for 8 to 10 minutes or until cheese is melted & Naan is crispy.
Note: I used toaster oven so it took me about 8 minutes. If using a big oven, it might take a little longer to cook.

Print this recipe >>

Sunday, April 22, 2012

Eli Palat (Sour Dal with Salted Dry Fish and Drumsticks)

I'm not sure where the name 'Eli Palat' comes from and it seems likes every family has their own versions and names for this dish. At the end, when we describe the dish, we all know what we're talking about :). It is somewhat similar to Sambar (South Indian Dish) but has salted dried fish and we usually make it a bit sourer than Sambar. You can say it is a combination of Dal and Achin Hin. You can basically add as many or little variety of vegetables as you like but few of the ingredients are necessary for the distinct flavor of this dish. Ingredients such as salted dried fish (Ng Chaut in Burmese), eggplant and vegetable drumsticks are a must for this dish, whereas, vegetables such as okra, carrots, potatoes, winged beans, long beans, bottle gourd and white radish can also be added but will also work without them.

I have used frozen Drumsticks because fresh ones were not available at that time. Frozen ones come pre-cut, ready to use and do not need to be thawed. Drumsticks can be found in Indian grocery stores.

For a complete meal, we like to serve this with some Red Chili Pound, Fried chicken or Beef, Rice and some fresh cut vegetables such as Cucumber, White Radish or Cabbage.


Eli Palat (Sour Dal with Salted Dry Fish and Drumsticks)

Serves: 4 to 6
Preparation Time: 15 minutes
Cooking Time: 1 hour

Ingredients:
1 cup Chana Dal/Split Black Chickpeas
Salt to taste
2 tablespoons Oil
2 teaspoons Cumin Seeds/Jeera
1 teaspoon Brown Mustard Seeds/Rai
1/2 teaspoon Fenugreek Seeds/Methi
2 cups Onions - finely chopped
3 ounces Salted Dried Fish
1 large stem Curry Leaves (about 1/4 cup loosely packed)
2 cups Tomatoes - finely chopped
1 tablespoon Ginger - grated or finely chopped
2 tablespoons Garlic - crushed or finely chopped
2 teaspoons Red Chili Powder
1/4 teaspoon Turmeric Powder
1 teaspoon Coriander Powder
1/2 teaspoon Cumin Powder
13 ounces Eggplant/Brinjal - cut into 1 inch cubes
12 ounces Vegetable Drumsticks (fresh or frozen) - if fresh scrape outer fiber layers with knife and cut into 2 1/2 inch pieces
3/4 cup Tamarind Pulp (adjust to taste)
1 Jalapeno or Any Green Chili - cut in chunks
1/4 cup Cilantro - roughly chopped
1 teaspoon Garam Masala Powder
4 Hard Boiled Eggs - shelled and cut in half

Optional Vegetables:
2 cups Long Beans - cut into 2 inch pieces
1 small Carrot - cut into 1 inch cubes
4 Okras/Lady Fingers - cut stem tip and cut into 2 inch pieces
*Combination of any other vegetables such as Potatoes, Winged Beans, Bottle Gourd and White Radish

Directions:
  1. Pressure cook Dal over medium low heat with 3 cups of water and a pinch of salt for 4 whistles or 6 minutes after cooker starts steaming.
  2. Turn off heat and keep aside until all pressure/steam has been released for about 10 to 15 minutes. Open cooker and stir with wire whisk to crush & smooth it out. Keep this aside.
  3. Meanwhile, heat oil in a large pot over high heat. Add cumin seeds, mustard seeds, fenugreek seeds and cook for few seconds until mustard seeds start to pop.
  4. Add onion, salted dried fish and sauté for few minutes until onion is wilted.
  5. Add curry leaves and stirring frequently, continue cooking until onion is lightly golden brown.
  6. Reduce heat to medium and add tomatoes, ginger, garlic, red chili powder, turmeric powder, coriander powder, cumin powder and stir well. Cover and cook for few minutes until tomatoes are crushed.
  7. Add eggplant and drumsticks along with long beans, carrots and any other vegetable (if using). If it is getting dry, add some water.
  8. Stir well, reduce heat to low, cover and cook for about 10 minutes or until eggplants are soft.
  9. Increase heat to high, add crushed Dal, tamarind pulp, and about 6 cups of water, cover and bring it to a boil
  10. Once it comes to a rolling boil, add Okra and salt to taste.
  11. Reduce heat to low and let it simmer partially covered for 15 to 20 minutes or until all vegetables soft and cooked through adding more water to adjust consistency as required.
  12. Garnish with Jalapeno, cilantro and garam masala powder. Turn off heat and cover the pot and leave it covered for about 5 minutes.
  13. When ready to serve, place couple of hard boiled egg halves in a serving bowl and pour over liquid & vegetables, and serve hot.
Note:
  • To cook without pressure cooker, place Dal in a bowl and wash with few washes of water. Fill enough water to cover Dal by couple inches and let it soak for at least 4 hours. Wash one more time and transfer to a pot. Add salt and enough water to cover it by few inches. Cook uncovered over medium to low heat, stirring occasionally to make sure it is not scorching at the bottom of the pot. Cook until dal is tender adding more water as required.
  • Amount of tamarind used for this dish will depend on the sourness of the tamarind itself and the amount of water used in making the pulp. Add few teaspoons at a time and adjust according to your desired sourness of the dish.  
Print this recipe >>

Thursday, April 19, 2012

Pesto Bread

I’m always thinking of what to serve for breakfasts during the weekdays. I try to make breads or snacks that we can eat by re-heating it in the mornings. I’ve had my eye on this bread for some time now and finally got a chance to make it. When it comes to making breads, I often refer to this website. If you’ve made breads before, this is no different but this one has such a dramatic look to it. I had a lot of fun making this. To save some time, I’ve used store bought Pesto Sauce and reduced the portion used because I was afraid it would be too salty.


Pesto Bread

Preparation Time: 30 minutes
Dough Rising Time: 2 hours
Baking Time: 30 to 35 minutes

Ingredients:
For Dough For Filling
2 cups Warm Water
2 tablespoons Olive Oil
2 tablespoons Sugar
1 tablespoon Active Dry Yeast
1/2 cup Milk Powder
1 tablespoon Salt
5 -5 1/2 cups Bread Flour
4 heaped tablespoons Pesto
1 cup grated Extra Sharp Cheddar 


Directions:
For Dough
  1. In a large bowl or bowl of your mixer, combine, water, oil, sugar and yeast; stir to combine and leave it aside for about 10 minutes until foamy.
  2. Add milk powder, salt and up to 4 cups of flour adding 1 cup at a time and stirring with a wooden spoon after each addition.
  3. Turn out dough to a lightly floured surface and knead by adding remaining flour as required until it no longer sticks to your hands. (If using a stand mixer, knead the dough with dough hook for about 3 to 4 minutes adding flour as required.)
  4. Place dough in lightly greased bowl, turning once to grease top.
  5. Cover with plastic and let rise in warm draft free place for about 1 hour or until doubled in bulk.
Filling and Shaping Dough
  1. Punch dough down and divide into two equal portions. (Keep one covered while working with the other.)
  2. Take one portion of dough and on lightly floured surface with a rolling pin, roll it into approximately 9 x 14 inch rectangle shape.
  3. Spread 2 tbsp of pesto and 1/4 cup of cheese, evenly over the surface. Fold in the sides about 1/2 inch to create a border.
  4. Starting at a short end, roll dough tightly, pinch dough to seal seam, and turn seam side under.
  5. With a sharp knife, cut the rolled dough lengthwise and open up to expose the inside filling.
  6. Take each of the cut piece and braid together with the cut side always facing up.
  7. Place this into lightly greased (8 ½ x 4 ½ inch) loaf pan.
  8. Repeat the same process with the other portion of dough.
  9. Cover both pans loosely with plastic and let rise in warm draft free place for about 1 hour or until doubled in bulk.
  10. Preheat oven to 375 degrees Fahrenheit 30 minutes or so before baking.
  11. Top both the loaves with remaining cheese and bake for 30 to 35 minutes. Check 10 minutes before they are done to see if they need to be covered with aluminum foil if they are getting too brown.
  12. Remove from loaf pan immediately and cool on wire rack.
Print this recipe >>

Wednesday, April 18, 2012

Egg Curry

This curry is one of Yogesh's favorite dishes. During his visits from Canada I used to make this dish for him. Back then, I occasionally cook and did not really know many dishes to prepare. I know that he likes curries with lots and lots of gravy and spices so I wanted a dish that uses a lot of spices. The curry didn't exactly turn out as I was imagining but I remember a friend once told me that whenever dishes go wrong, just add coconut milk and it will be all good. So, that is what I did and loved this curry ever since. I like to serve this with steam rice, pickled banana peppers and some type of salad or vegetable stir-fry. It goes really well with Naan or Chapati as well.


Egg Curry

Serves: 4
Preparation Time: 10 minutes
Cooking Time: 35 minutes

Ingredients:
2 tablespoons Oil
1 teaspoon Cumin Seeds/Jeera
1 teaspoon Brown Mustard Seeds/Rai
1/2 teaspoon Fenugreek Seeds/Methi
3 whole Dry Red Chilies (optional)
2 1/2 cups Onion - finely chopped
1 large stem Curry Leaves – stripped off leaves and discard stem
1 tablespoon Ginger - grated or finely chopped
1 tablespoon Garlic - crushed or finely chopped
2 teaspoons Red Chili Powder (adjust to taste)
1 teaspoon Turmeric Powder
1 1/2 teaspoons Garam Masala Powder
2 1/2 tablespoons Tomato Paste
8 Hard Boiled Eggs – shell removed and cut 3 to 4 slits through egg whites
1/2 cup Coconut Milk
Salt to taste
1/4 cup Cilantro - roughly chopped
1 Jalapeno or any Green Chili - cut in chunks

Directions:
  1. Add oil in a large pot over high heat. Once hot, add cumin seeds, mustard seeds, Fenugreek seeds and dry red chili.
  2. Once mustard seeds start to pop, add onion, a pinch of salt and cook stirring occasionally for few minutes until onion is translucent.
  3. Add curry leaves and continue cooking until onion starts to turn light golden color.
  4. Reduce heat to medium, add ginger, garlic and cook for further minute till fragrant.
  5. Add red chili powder, turmeric powder, 1 tsp garam masala powder and cook for few more seconds.
  6. Add tomato paste, cook for few seconds and add about 1 cup of water. Stir well, reduce heat to low, cover and cook for 5 to 10 minutes.
  7. Add boiled eggs, salt to taste, mix well and cook covered for another 5 to 10 minutes adding some water if required.
  8. Add coconut milk and continue cooking covered for about 5 more minutes.
  9. Make necessary adjustments to consistency of the gravy by adding more water if required. Garnish with cilantro, jalapeno and remaining 1/2 tsp garam masala powder. Cover the pot and leave it covered for 5 minutes. Mix once before serving.
Print this recipe >>

Tuesday, April 17, 2012

Pe Pyot (Boiled Peas)

Pe Pyot is commonly served as a breakfast item. If you're from Burma, you might not know how to make Pe Pyot from dry yellow peas but once you have the boiled Pe Pyot, you'll definitely know how to serve it. Back home, we usually do not prepare it from scratch. There are street vendors that sell these boiled Pe Pyots early in the morning. Every area has its own vendor selling freshly boiled and warm Pe Pyot. They only make a basket full each day so you have to go quite early or it will be all gone.

There are different ways to serve Pe Pyot and I love it all. Most popular ways of serving this is by adding to fried rice or cooking with fried onions and serve with Naan or Paratha. It is not difficult to make it but does require time for pre-soaking and sprouting. Since it is a long process, it is a good idea to make a large batch and freeze individual serving sizes in Ziploc bags. I got this recipe from my Aunt few years back. This recipe is only for preparing Pe Pyot from dried yellow peas. I'll post more recipes on how to serve them when I get a chance. For now, I've frozen mine for later use.

Most of the Indian grocery stores carry Yellow Peas and it is known as ‘Vanata’ in Gujarati.

Cooked Yellow Peas
Dry Yellow Peas
Sprouted Yellow Peas
Pe Pyot

Makes: Approximately 10 cups
Soaking Time: 8 hours
Sprouting Time: 36 hours or more
Cooking Time: 45 minutes to 1 hour

Ingredients:
4 cups Yellow Pea (Vatana)
1 teaspoon Baking Soda
2 teaspoons Salt
2 teaspoons Sugar
2 tablespoons Oil

Directions:
  1. Soak peas in a large pot with plenty of water (at least 5 to 6 inches of on top) for at least 8 hours to overnight. They will expend for more than double of its size. (I got a little over 10 cups after soaking)
  2. Drain water in a large colander, keep colander on a plate and cover the peas with wet towel. Leave it this way for about 36 hours or until it starts to sprout. (Wet the towel 2 to 3 times in between or whenever the towel dries out.)
  3. Transfer to a large pot; add all ingredients along with 3 cups of water. Stir or toss to combine and bring it to a boil over high heat.
  4. Reduce heat to as low as possible, cover the pot and let it cook for 45 minutes to an hour until it is cooked through and all water has been evaporated. Toss or stir once or twice in between to check water level and doneness of the peas. If water dries out before peas are cooked through, sprinkle some warm water and continue cooking until soft.
Print this recipe >>

Saturday, April 14, 2012

Dal

We made Dal at home quite often while growing up. My Dad always says that Dal completes a meal. This is a basic Dal that my Mom used to prepare. It is a versatile recipe and can be prepared in a variety of different ways. If you're short with some ingredients, you can still prepare Dal. For instance, you can use both tomato and onion to flavor Dal but if you're out of one, you can still prepare with the other.

We usually prepare it with a blend of four types of Dals but you can still prepare it by using only one type such as Toor or Chana Dal.  Keep in mind that Chana Dal takes much longer time to cook then Toor Dal. Curry Leaves give a very good aroma to the dish but if you're unable to find it, you can skip this ingredient. Curry Leaves can be found in most of Indian and Pakistani grocery stores.

I cook Dal using a pressure cooker so I do not need to soak them in water. However, without pressure cooker, you will need to soak and boil for longer time. I like to serve Dal with rice, some vegetable and meat dish.


Dal

Click on above image to enlarge

Serves: 4
Preparation Time: 15 minutes
Cooking Time: 45 minutes

Ingredients:
Dal Base
1/4 cup Oily or Palin Toor Dal (Split Yellow Pigeon Pea)
1/4 cup Chana Dal (Split Black Chickpeas)
1/4 cup Moong Dal (Split Yellow Moong Bean)
1/4 cup Masoor Dal (Red Lentil)
1 teaspoon Salt

Seasoning
1 1/2 teaspoons Cumin Seeds
1 tablespoon Ghee or Oil
1 teaspoon Brown Mustard Seeds (Rai)
1 cup Onion - finely chopped
1 stem Curry Leaves – remove leaves and discard stem
1 cup Tomato – chopped
1 tablespoon Ginger – grated or finely chopped
1 tablespoon Garlic – crushed or finely chopped
2 teaspoons Red Chili Powder
1/4 teaspoon Turmeric Powder
1 teaspoon Coriander Powder
1/2 teaspoon Cumin Powder
1 large Jalapeno or any Green Chili - cut in big chunks
1/4 cup Cilantro - finely chopped
1/2 teaspoon Garam Masala Powder
Salt to taste

Directions:
Dal Base

  1. Combine all Dals in a pressure cooker pot and wash with few washes of water. Add 3 cups of water, salt and pressure cook over medium low heat for 4 whistles or 3 to 4 minutes after cooker starts steaming.
  2. Turn off heat and keep aside until all steam has been released for about 10 to 15 minutes. Open cooker and stir with wire whisk to crush and smooth it out.
  3. Add 3 1/2 cups of water; stir and bring it to a boil.
Seasoning
  1. While Dal is boiling; in a separate skillet over medium high heat, add cumin seeds and let it toast till fragrant and few shades darker.
  2. Add ghee or oil and mustard seeds. Once the mustard seeds pop, add onion and cook stirring frequently until onions are translucent.
  3. Add curry leaves and cook until onions are lightly golden in color.
  4. Add tomato, ginger, garlic, red chili powder, turmeric powder, coriander powder and cumin powder. Stir well and add some water if it is too dry.
  5. Continue cooking for few minutes until tomatoes are crushed.
  6. Pour this mixture to the dal pot and mix well. Season it with salt, and let simmer for 10 to 15 minutes adding more water (if required) for desired thickness of dal.
  7. Garnish with Jalapeno, cilantro and Garam Masala Powder; turn off heat and cover pot immediately. Let it sit for 5 minutes covered. Stir well before serving.
Note:
To cook without pressure cooker, combine all Dal in a bowl and wash with few washes of water. Fill enough water to cover Dal by couple inches and let it soak for at least 4 hours. Wash one more time and transfer to a pot. Add salt and enough water to cover it by few inches. Cook uncovered over medium to low heat, stirring occasionally to make sure it is not scorching at the bottom of the pot. Cook until dal is tender adding more water as required.

Print this recipe >>

Thursday, April 12, 2012

Basic White Bread with Jalapeno

We have been eating store bought breads for so long that I have forgotten how good homemade bread could taste. My sister used to bake a variety of breads and pastries for us back home. During that time, she made everything from scratch. We did not have a machine to knead the dough or a full size oven to bake. She made all her baked goodies using a small convention oven.

I love everything about homemade breads; fragrance while baking, warmth of a freshly baked bread, its delicate texture, and best of all, simple yet delicious taste of it. I’m still new to making breads but it is not as difficult as I initially thought it would be. It does require some time but most of the time it needs is for dough resting so you’re not actively involved during that process.

This is a basic loaf of bread with an addition of Jalapeno peppers. This recipe came with my KitchenAid mixer and original recipe is for 2 loaves of bread. I usually make one loaf at a time so below is the one loaf version. If you don’t have a machine, you can just knead the dough with hands.


Basic White Bread with Jalapeno
Click on the image to enlarge

Makes: 1 loaf
Preparation Time: 30 minutes
Dough Rising Time: 2 hours
Baking Time: 30 minutes

Ingredients:
1/4 cup Milk
1 1/2 tablespoons Sugar
1 1/2 tablespoons Butter or Margarine
3/4 cup Water
1 packet Active Dry Yeast (1/4 ounce packet or 2 1/4 teaspoons from bulk)
2 1/2 to 3 cups Unbleached All Purpose Flour
1 teaspoon Salt
Oil Spray
1 Jalapeno – finely chopped

Directions:
  1. In a small sauce pan, heat milk, sugar and butter over medium heat just until the butter is melted and sugar is dissolved. Pour it into a stand mixer bowl or a large bowl, if kneading by hand.
  2. Add room temperature water to the bowl and stir. This will bring down the liquid temperature to lukewarm. The temperature should be around 105 to 110 degree F.
  3. Add yeast to the liquid mixture, stir and keep aside for 5 to 10 minutes until foamy.
  4. In a separate clean bowl, sift 2 cups of flour and salt together. Add flour to the liquid mixture and attach bowl and dough hook. Turn on to speed 2 and mix for about 1 minute. (If kneading by hand, use a wooden spatula and stir to combine)
  5. Meanwhile, sift the remaining 1 cup of flour in a separate bowl. You might not need to use all of the flour while kneading.
  6. Continuing the machine on speed 2, add the remaining flour 1/3 cup at a time until the dough clings to the hook and cleans the sides of the bowl. Knead on speed 2 for 2 more minutes or until dough is smooth and elastic. Dough will be slightly sticky to the touch. (If kneading by hand, pour dough out to lightly floured surface and knead, adding flour as required until dough is smooth and elastic, for about 10 minutes)
  7. Place dough in lightly greased bowl, turning once to grease top.
  8. Cover with plastic and let rise in warm draft free place for about 1 hour or until doubled in bulk.
  9. Punch dough down, add jalapeno and knead to combine. On lightly floured surface with a rolling pin, roll into approximately 8 x 14 inch rectangle shape.
  10. Starting at a short end, roll dough tightly, pinch dough to seal seam, pinch ends and turn under. Place the shaped dough seam side down in a lightly greased (8 ½ x 4 ½ x 2 ½) inch loaf pan.
  11. Cover loosely with plastic and let rise in warm draft free place for about 1 hour or until doubled in bulk.
  12. Preheat oven to 400 degrees Fahrenheit 30 minutes or so before baking.
  13. Bake the bread for 30 minutes or until golden brown. Remove from loaf pan immediately and cool on wire rack. 
Print this recipe >>

Wednesday, April 11, 2012

Triple Onion Cheese Buns

I like homemade breads and this is one of my favorites. I came across this recipe a while back and have made it few times. I replaced shallots and chives with red onion and green onions, mainly because I don't have it handy. Since I don't eat bacon, I've made without it and it still taste pretty good. For this batch, I've used Turkey Bacon.

For cheese, I like to use Habanero Cheddar. I came across this cheese in Costco while they were selling special flavor cheeses. They don't carry it all the time but I was lucky to have found it twice. I love cheddar cheese and I love spicy food. This cheese was a perfect combination. It was not too spicy but has a good kick. The last time I bought, I freeze it and I'm using it for this batch of bread. You can still make it with Gruyere Swiss Cheese as mentioned in original recipe or any of your favorite cheese.

If you're new to making breads at home as I am, make dough as per recipe and be creative with filling and topping.


Triple Onion Cheese Buns

Makes: 16 to 18 buns
Preparation Time: 30 minutes
Dough Resting Time: 2 hours
Cooking and Baking Time: 25 minutes

Ingredients:
For Dough For Filling
3/4 cup Water
1/2 cup Milk
1/4 cup Butter
1/4 cup Honey
3 1/2 to 4 cups Bread Flour
1 Large Egg - lightly beaten
4 teaspoons Active Dry Yeast
1 1/4 teaspoons Salt
3 tablespoons Butter
1 tablespoon Garlic - crushed or finely chopped
1/2 cup Chives or Green Onions - thinly sliced
1/2 cup Shallots or Red Onion - finely chopped
1/2 cup Onions - finely chopped
4 slices Turkey Bacon - cooked and crumbled
2 to 2 1/2 cups Habanero Cheddar Cheese or Gruyere Swiss Cheese


Directions:
For Dough
  1. In a small saucepan, combine water, milk, butter and heat until butter is melted without bringing it to a boil. Transfer to a large bowl and let cool until lukewarm or 110 degrees Fahrenheit.
  2. Add honey, 1 1/2 cups of flour and stir with a wooden spoon or spatula until smooth.
  3. Add egg, yeast and mix well till smooth. Keep this aside for 15 minutes.
  4. Add salt along with 1 cup of flour and mix again.
  5. Pour out to a clean surface and knead dough by adding remaining flour until it no longer sticks to the counter. Knead for 8 to 10 minutes by hand. (If using stand mixer, knead for 5 to 6 minutes by adding flour just until dough pulls away from the sides of the bowl)
  6. Place dough in lightly greased bowl, turning once to grease top. Cover with plastic and let rise in warm draft free place for about 1 hour or until doubled in bulk.
For Filling
  1. While dough is resting, heat butter in a skillet over medium heat. Add garlic and sauté for few seconds till fragrant.
  2. Add all three types of onions and sauté until onions are translucent. Turn off the heat, add bacon, mix well and keep aside to cool.
Making Buns
  1. Punch dough down and on lightly floured surface with a rolling pin, roll into approximately 12 x 24 rectangle shape.
  2. Evenly spread onion bacon mixture and 1/2 of the cheese. Staring from the long end, roll dough tightly and pinch to seal seam and turn under.
  3. Cut the dough log into 16 to 18 equal pieces and place each in a lightly greased muffin tin. Cover loosely with plastic and let it rise in warm draft free place for 1 hour or until doubled in bulk.
  4. Preheat oven to 350 degrees Fahrenheit.
  5. Top the buns with remaining cheese and bake for 15 to 20 minutes until nicely browned.
  6. Allow to cool in muffin tin for 5 minutes. Remove from muffin tins and let cool on wire rack.
Note: Since I only have one muffin tin that fits 12 pieces, I kept the remaining pieces on a lightly greased tray.

Print this recipe >>