Saturday, March 31, 2012

Crispy Fried Chicken

This fried chicken is the way my Mom used to make for us and I love this type of crispy fried chicken. They are so crispy that you can even chew off most of the bones. I believe this method of preparation is quite common in Burma. First to cook the meat with flavoring and later deep fried. I like to use smaller size chicken where one chicken weights about 2 to 2.5 pounds, but no bigger than that. I usually buy one whole chicken and tell the butcher to cut it up into approximately 2 inch pieces. Sometimes, I like to use just the drumsticks. It is good to be paired with some Burmese sour soup or Dal and rice as a meal.


Crispy Fried Chicken


Serves: 4
Preparation Time: 5 minutes
Cooking Time: 40 minutes

Ingredients:
2 pounds Bone-in Skinless Whole Chicken - cut into 2 inch pieces
  or Skinless Chicken Drumsticks
2 tablespoons Garlic - pressed or finely chopped
1 1/2 tablespoons Ginger - grated or finely chopped
1 1/4 teaspoons Turmeric Powder
2 tablespoons Vinegar or Lime Juice
Salt to taste

Directions:
  1. Combine all ingredients in a pot, mix well to coat chicken with all ingredients.
  2. Cover and cook over low heat for 10 to 15 minutes until chicken starts to release liquid.
  3. Depending on the amount of liquid, adjust heat medium or high and cook until all water is evaporated and chicken is cooked through.
  4. Let this cool and deep fry over medium heat in couple batches for few minutes until it is golden brown and crispy. Serve hot.
Print this recipe >>

Friday, March 30, 2012

Red Chili Pound
Ngayothi Anee Thaung

This is one of my favorite condiments. It is called chili pound because traditionally each ingredient is deep fried separately and pounded using a Mortar & Pestle. Later it is mixed and pounded again. I usually make it two different ways depending on my mood.

First method is following traditional way but since I don’t own a good Mortar & Pestle, I just use my small food processor to do the job. This method gives you a nice smoky flavor end result.

Sometimes when I don’t want to fry or use food processor, I use pre-ground ingredients to make this. The good thing about this method is that it is easy and fast to make. The downside to this method is during the cooking process the fume of chili could be overwhelming at times. This gives less smoky flavor end result but I still like to make it every now and then.

I like to eat it along with Achin Hin (Sour Soup), Rice, Tomato Curry and some fried meat. You can also pair it with Dal and Rice by squeezing some lime juice in it before serving. This is a condiment so it is usually made spicier to be paired with other dishes. The spiciness will depend on the dried chilies used so adjust according to taste.


Red Chili Pound

Traditional Method

Serves: 4
Preparation Time: 10 minutes
Cooking Time: 10 minutes

Ingredients:
1 ounce Whole Dried Red Chili (use more or less depending on spiciness of dried chilies or taste)
7 cloves of Garlic
1/4 cup small to medium Whole Dried Shrimp
1 medium to large Tomato
Oil for frying
Salt to taste

Directions:
  1. Fry each ingredient separately over medium low heat with few inches of oil.
  2. Fry dried chili until few shades darker and crisp. Fry garlic and dried shrimp until golden brown.
  3. Fry whole tomato for a minute or two turning few times to coat all sides of tomato until skin burst and peeled off.  Let cool, peel the skin off and cut in quarter.
  4. Using a food processor or mortar & pestle, grind each ingredient separately. Grind chili into crushed red pepper consistency, garlic into fine paste, dried shrimp into fine powder and lastly tomato into fine puree.
  5. Combine all ingredients in food processor, add salt to taste and pulse for few times for all ingredients to come together.
  6. Transfer to a small bowl and serve at room temperature.
Easy but Smoke Alarm Method

Serves: 4
Preparation Time: 5 minutes
Cooking Time: 10 minutes

Ingredients:
1 tablespoon Oil
1 tablespoon Garlic – crushed or finely chopped
1/4 cup Crushed Red Pepper
2 teaspoons Dried Shrimp Powder
1 medium Tomato – skin peeled and finely chopped
Salt to taste

Directions:
  1. Heat a small skillet with oil over medium low heat. Add Garlic and stir for few seconds.
  2. Add crushed red pepper and while stirring cook for 1 minute or two until it gets few shades darker and fragrant.
  3. Add dried shrimp powder and continue cooking until lightly browned. Be careful not to burn it.
  4. Add tomato and cook stirring continuously for few minutes until all tomatoes are crushed and everything comes together. Turn off heat, transfer to a small bowl and serve at room temperature.
Variation:
To make it Vegetarian or Vegan dish, skip on dry shrimp.

Print this recipe >>

Thursday, March 29, 2012

Burmese Tomato Curry

This is a type of curry where it is cooked until all water has evaporated and left with a very thick (almost jam-like) gravy.  You can add Shrimp paste (Ngapi, Belacan) in this dish but I prefer without it. Usually, a lot of Burmese dishes use quite a good amount of oil. For instance, this dish would be made with enough oil to be separated and a thick or thin layer of oil lying on top of the dish. However, I’m not using as much oil as that. This dish is good to be paired with Achin Hin (Sour Soup), Red Chili Pound, Rice and some type of fried meat.


Burmese Tomato Curry

Serves: 2
Preparation Time: 15 minutes
Cooking Time: 20 minutes

Ingredients:
2 tablespoons Oil
1 tablespoon Garlic – pressed or thinly sliced (about 4 cloves)
1 teaspoon Crushed Chili Pepper (adjust to taste) (optional)
1 cup Onion – finely chopped
2 teaspoons Dry Shrimp Powder
2 cups Tomatoes – diced small
1 teaspoon Ginger – grated or finely chopped
1/8 teaspoon Turmeric Powder
2 teaspoons Red Chili Powder
3/4 tablespoon Fish Sauce (adjust to taste)
1 Fresh Jalapeno Pepper or any Green Chili – cut in chunks or thinly sliced
1/2 cup Cilantro – finely chopped

Directions:
  1. Heat a pan with oil over medium heat and sauté garlic and crushed chili pepper for few seconds. Add onions and fry for few minutes until translucent.
  2. Add dry shrimp and stirring frequently, continue cooking for few more minutes until onions are lightly browned.
  3. Add tomato, ginger, turmeric powder, red chili powder and fish sauce. Cook for about a minute, stirring often.
  4. Reduce heat to low, cover the pan and cook for about 5 to 8 minutes stirring occasionally until tomatoes are soft and all crushed.
  5. Increase heat to high and stirring frequently continue cooking until all water has evaporated and gravy becomes like a thick paste, for about 5 minutes.
  6. Garnish with Jalapeno and cilantro, cover immediately and let sit for about 5 minutes. Stir once or twice before serving. This can be served hot or at room temperature.
Print this recipe >>

Tuesday, March 27, 2012

Steamed Buns with Coconut Filling

Chinese steamed buns are very popular in Burma and we call them Pausi. There are different varieties of fillings that you can get but most common ones that I grew up eating were curry chicken with boiled egg, red bean paste and coconut. I've been craving for these buns for a while now but haven't really found a recipe that uses only basic ingredients for the dough until I saw this recipe on Maangchi's website. I've been planning to make this for some time now but never actually got a chance to try it out. I wanted to make the savory version with curry chicken but I don't remember it enough to come up with something close to what I used to eat. At last, I decided to give it a shot with coconut filling while waiting for my sister to give me recipe for curry version.

The dough recipe is quiet easy to follow and the filling used here is very simple. Dough can be filled with variety of vegetable, meat or sweet fillings. This coconut filling is also very versatile and can be used to fill puff pastries or even spring roll sheets to form spring rolls or samosas. Combinations are endless and sky is the limit :). I'll post more in future when I make them. Below is half of original recipe.


Steamed Buns with Coconut Filling

Makes: 8 buns
Preparation Time: 30 minutes
Cooking Time: 30 minutes
Dough Resting Time:  1 hour 30 minutes

Ingredients:
For Dough:

1/2 cup Luke Warm Water (between 105 and 110 degrees Fahrenheit)
1 teaspoon Active Dry Yeast
1 tablespoon Vegetable Oil
1/2 teaspoon Sugar
1 1/2 cups All Purpose Flour
1/4 teaspoon Salt
Oil Spray

For Filling:
6 ounces Fresh Coconut – shredded (about 1/2 coconut or 2 1/2 cups shredded)
2 tablespoons Sugar (Adjust to taste)
Pinch of Salt

Other:
8 Standard Cupcake Liners or Parchment Paper cut into 4 inch squares

Directions:
  1. In a large bowl, combine water, yeast, oil and sugar. Mix with a spoon until well combined.
  2. Sift in flour and salt into the liquid mixture and stir with a wooden spatula to combine. When it becomes hard to stir, start kneading dough with hands until smooth for about 2 to 3 minutes.
  3. Lightly coat the bowl with oil spray, put dough, turn once to coat with oil, cover and leave it in warm area for about 40 minutes or until doubled in size. (For faster rising, place the bowl in a larger bowl filled with warm water)
  4. Knead the dough for about a minute to remove air, cover and leave it again for another 30 minutes.
  5. Meanwhile, in a medium size pan combine coconut, sugar, salt and cook over medium low heat stirring frequently until sugar is melted for about 2 to 3 minutes. Remove from heat and let it cool completely.
  6. Place cupcake liners 1 inch apart on the rack of a steamer and keep aside.
  7. Take dough and divide into 8 equal portions. (Keep unused dough covered to prevent from drying out.)
  8. On lightly floured surface, roll each portion into approximately 4 inch circles leaving center thicker than edges.
  9. Take a heap tablespoon (or 1/8) of filling and place in middle of the circle. Gather the edges of the dough and conceal the filling by pinching and sealing the edges while forming pleats. Twist ends off to seal and close; and place it in prepared steamer rack.
  10. Continue rolling and filling rest of the dough, cover and let it rise for 20 minutes.
  11. Steam the buns for 20 minutes, covered and undisturbed.
  12. Turn off the heat, remove buns from steamer and serve.
Note: Steamed buns can be kept at room temperature for a day or two. Keep them in fridge for few more days after that. Before serving, wrap it with damped paper towel and microwave for 10 to 15 seconds.

Print this recipe >>

Saturday, March 17, 2012

Chicken Tikka

There are different ways of making Chicken Tikka but this is a simple yet tasty version that my sister usually makes. I marinate it overnight if I plan ahead but sometimes I just let it sit for a while and cook right away and they taste pretty good as well. You can serve it with some dal, rice and kachumber or top it up on your favorite salad.


Chicken Tikka

Serves: 2
Preparation Time: 10 minutes
Marinating Time: 30 minutes to overnight
Cooking Time: 15 to 20 minutes

Ingredients:
Marinate:
2 tablespoons (about 7 cloves) Garlic - pressed or finely chopped
2 teaspoons Ginger - grated or finely chopped
2 1/2 tablespoons (about 1/2 lime) freshly squeezed Lime Juice
1/2 cup plain Yogurt
1/4 teaspoon Turmeric Powder
1 1/2 teaspoons Red Chili Powder (adjust to taste)
1 teaspoon Garam Masala Powder
Salt and Pepper to taste

Other Ingredients:
1 pound boneless skinless Chicken Breast - sliced into 1/4 inch thick slices
Oil Spray for cooking

Directions:
  1. In a bowl, combine all marinate ingredients, mix well and make necessary adjustments to taste.
  2. Pour marinate over chicken and mix well to coat all chicken. Marinate for 30 minutes to overnight in fridge.
  3. When ready to cook, heat a large skillet over medium to medium low heat and spray it with oil. Place chicken pieces keeping about 1 inch space in between each piece and cook for about 3 to 4 minutes per side until it is cooked through and browned nicely. (Do not overcook or it will be dry. You might need to cook in two different batches as you do not want to over crowd the pan. Try not to move the pieces too much while cooking to get even brown color.)
  4. Once cooked through, transfer to a plate and serve hot with dal, rice and kachumber.
Note: If there is a lot of marinate liquid left after cooking the chicken, reheat the skillet with few drops of ghee or oil spray and add the marinate liquid. Add some water and cook over high heat until all water has evaporated, it starts to sizzle and brown slightly. Pour it over chicken and serve.

Print this recipe >>

Friday, March 16, 2012

Pad Thai with Western Twist

We usually don't order Pad Thai when we go to Thai restaurants, mainly because I find that most restaurants give you lumpy and clump up noodles. I'm not too crazy about the texture of the noodles served in this dish. However, I love the version of Pad Thai that my younger sister makes. She uses Brown Rice Spaghetti for this dish. It might sound a bit awkward but this spaghetti absorbs the flavoring so well and has a good texture. I bought mine from Trader Joe's.

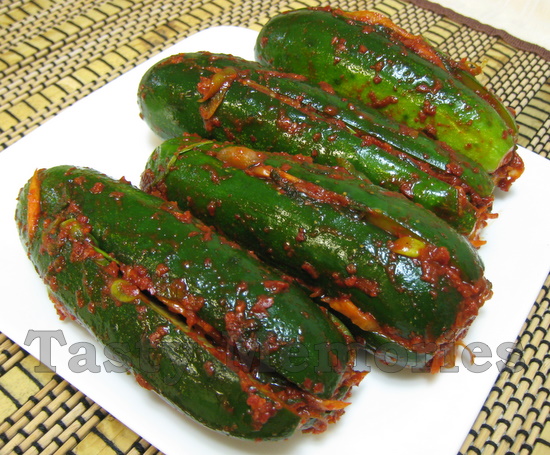
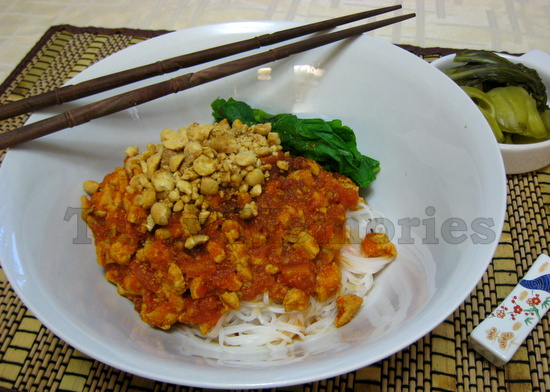
I've had this recipe for some time now but never actually got a chance to make it. I usually request for her to make this dish but with busy schedules and my cravings, I decided to give it a try. It turns out pretty good and we were so hungry and want to eat it while still hot that couldn't even plate it to take picture :). I added some mini sweet peppers as I had a lot on hand and served with some Stuffed Cucumber Kimchi on the side.


Pad Thai with Western Twist

Serves: 4
Preparation Time: 20 minutes
Cooking Time: 30 minutes

Ingredients:

1/2 pound brown rice spaghetti/fettuccine or White rice noodles
2 tablespoons oil
Salt to taste
1 tablespoon garlic - pressed or finely chopped
1/2 pound firm tofu - cut into 1/2 inch cubes
3 cups bean sprouts
1 pound cocktail shrimp
1/4 cup roasted peanuts - coarsely ground
1/4 cup cilantro - roughly chopped
2 green onions - sliced thinly
3 mini sweet peppers of different colors – thinly sliced lengthwise (optional)
Crushed red peppers to taste

Seasoning:
4 tablespoons white wine vinegar or rice vinegar
3 tablespoons tamari
3 tablespoons honey
2 teaspoons paprika

Directions:
  1. Bring a large pot of water to a boil. Add salt and 1/2 tbsp of oil to boiling water, add noodles and cook until just tender, about 8 to 12 minutes (or according to package directions). Drain, rinse with cold water, drain again and set aside.
  2. In a bowl, combine all seasoning ingredients and keep aside.
  3. Have all ingredients prepared before starting to stir fry.
  4. Heat remaining 1 1/2 tbsp of oil in a large frying pan over high heat. Add garlic and stir-fry for about 30 seconds or so until it begins to turn golden.
  5. Add tofu and sauté for 2 minutes or so, stirring often until tofu beings to brown.
  6. Add the prepared seasoning liquid and mix thoroughly.
  7. Stir-in the noodles, 2 cups of bean sprouts, shrimp and half of ground peanuts. Toss to mix well, adjust to taste and turn off heat.
  8. Garnish with remaining bean sprouts & peanuts, cilantro, green onions, mini sweet peppers and crushed red peppers. Serve immediately.
Variation
For Vegetarian friendly version, skip shrimp. For Vegan version, skip shrimp and replace honey with brown or regular sugar.   
Print this recipe >>

Roasted Greek Potatoes

I love potatoes in any way they’re prepared. I found this recipe few years back online and have made it few times. I really like the taste of lemon in the potatoes. I usually make it with all red potatoes but added some purple potatoes this time as I had it on hand. It is easy to prepare and if you’re using oven method, you can pretty much leave it on its own and check every now and then. I sometimes make it on stove as it is a little faster. I like both methods equally and have listed both below. Serve with lemon rice, tzatziki, Greek chicken and Greek Salad.


Roasted Greek Potatoes


Serves: 2
Preparation Time: 5 to 10 minutes
Cooking Time: 1 hour (Oven Method)
30 minutes (Stovetop Method)

Ingredients:
1 pound red potatoes or mixture of red and purple potatoes – skin on and cut into 1 inch cubes
1/3 cup fresh lemon juice
3 cloves garlic – pressed or finely chopped
1 tablespoon dried oregano
1/2 teaspoon sugar
2 tablespoons olive oil
Salt and pepper to taste
1 tablespoon flat leaf parsley for garnish (optional)

Directions:
Oven Method
  1. Preheat oven to 375 degrees Fahrenheit
  2. Place potatoes in a parchment lined baking dish.
  3. In a small bowl, combine the rest of the ingredients; pour it over potatoes and mix well to coat all potatoes.
  4. Cover baking dish with foil and bake for 30 minutes.
  5. Remove foil, increase oven temperature to 400 degrees Fahrenheit and stir potatoes once and continue cooking for 30 more minutes or until it is cooked through and nicely browned. Stir once in between to get even brownness.
  6. Remove from oven and garnish with parsley.
Note: For softer potatoes, 5 minutes before they’re done, cover them again with foil.

Stovetop Method

  1. In a microwave save bowl large enough to hold all the potatoes, add all ingredients except potatoes and mix well. Add potatoes, mix again, cover and microwave on high for about 4 minutes.
  2. Heat a large pan over high heat and add potatoes with all its liquids.
  3. Stir for few seconds, reduce heat to low, cover the pot and cook for 15 to 20 minutes until potatoes are cooked through stirring few times in between.
  4. Increase heat to high and stirring frequently, continue cooking until potatoes start to get nice brown color. Garnish with parsley and serve hot. 
Print this recipe >>

Thursday, March 15, 2012

Tzatziki

Tzatziki is super easy to make and full of flavor. Greek yogurt is basically a strained yogurt. I usually buy Greek-style yogurt from Trader Joe’s but if you can’t find this type of yogurt, you can use regular plain yogurt and strain it in refrigerator with few layers of cheesecloth for few hours to overnight to remove all moisture.  Also make sure to remove as much moisture out of cucumbers as possible so that it does not dilute the yogurt.  Pair it with Greek chicken, Greek salad, lemon rice and roasted potatoes.


Tzatziki

Serves: 4
Preparation Time: 5 to 10 minutes
Chilling Time: 30 minutes to overnight

Ingredients:

1/2 Persian cucumber – peeled, seeds removed, grated and squeezed water out (about 1/4 cup worth)
1 big clove garlic – pressed or finely chopped
1/2 tablespoon olive oil
1/2 tablespoon rice vinegar or red wine vinegar
1 cup Greek-style yogurt
Salt to taste

Directions:
  1. In a bowl combine cucumber, garlic, olive oil & vinegar and stir well.
  2. Add yogurt, salt to taste and mix everything well. Chill in fridge for at least 30 minutes to overnight if possible and serve chilled.
Print this recipe >>

Wednesday, March 14, 2012

Lemon Rice Pilaf

This Lemon Rice Pilaf really goes well with Mediterranean food. This recipe is adapted from Rachael Ray's '30-Minute Meals 2'. Pair it with some type of grilled meat and vegetable salad or with Greek salad, Greek chicken, and some roasted potatoes.


Lemon Rice Pilaf

Serves: 2
Preparation Time: 5 minutes
Cooking Time: 25 to 30 minutes

Ingredients:
1/2 tablespoon oil
1/2 tablespoon butter
1 large shallot – finely chopped
1 cup long grain rice – rinsed and drained
2 cups chicken or vegetable stock
1 tablespoon fresh thyme leaves
Zest from 1 lemon
1/2 cup flat leaf parsley – finely chopped
1/4 cup toasted slivered almonds for garnish

Directions:
  1. Heat a pot over medium high heat and add oil & butter.
  2. Add shallots and sauté for about a minute or so until lightly browned.
  3. Add rice and brown the rice for 2 to 3 minutes stirring frequently.
  4. Add chicken or vegetable stock, thyme and bring it to a boil.
  5. Once it comes to a boil, reduce heat to very low, cover pot with tight lid and cook undisturbed for 20 minutes.
  6. After 20 minutes, all liquid should be evaporated and rice will be cooked. Add lemon zest, parsley and mix well.
  7. Transfer rice to serving platter, top it up with almonds and serve.
Variation:
  • For vegan friendly version, skip butter and use oil instead. Use vegetable stock instead of chicken stock.
Note: I use regular long grain rice, not Basmati or Jasmine kind, because I like the texture of the long grain rice. It is not sticky, too soft or puffy but loose with a bit of chewy texture.

Print this recipe >>

Tuesday, March 13, 2012

Tilapia Larb (Tilapia Salad)

I love Thai food and Larb is one of my favorite Thai salads. My dad used to make beef or chicken Larb for us often. Although Larb is usually made from ground meat, I tried making it with fish and really enjoyed eating it. It is quick & easy to prepare and healthy & tasty as well. The ingredients used here are similar to the Thai Grilled Beef Salad I’ve previously posted but this one comes together much faster.


Tilapia Larb (Tilapia Salad)


Serves: 2
Preparation Time: 15 – 20 minutes
Cooking Time: 10 minutes

Ingredients:
8 ounces skinless Tilapia fillet
3/4 cup red onion – thinly sliced
1/2 cup green onion – thinly sliced (about 2 green onions)
1/2 cup cilantro – roughly chopped
1/2 cup mint leaves– roughly chopped
2 teaspoons uncooked sweet rice/glutinous rice – toasted on skillet until fragrant and lightly browned; and ground to a coarse powder
2 teaspoons crushed chili pepper - lightly toasted on skillet till fragrant (adjust to taste)
1 lime – extract juice (adjust to taste)
1 1/2 tablespoons fish sauce (adjust to taste)
Black pepper to taste (optional)
Oil spray

Directions:
  1. Have all ingredients ready before cooking the fish.
  2. Heat a skillet over medium heat with oil spray. Once hot, add fish fillets and pan fry for few minutes per side until flaky and cooked through.
  3. Smash it lightly using a fork to break into big chunks. Season it with some black pepper, if desired.
  4. If you do not like raw onion taste, add the onion and cook for further minute, stirring gently. If not, turn off the heat and remove from heat. Add all the remaining ingredients and adjust according to taste.
  5. Serve hot with steam rice and fresh vegetables such as cabbage and cucumber pieces.
Note: I usually make toasted sweet rice and toasted crushed chili pepper in larger quantities (about 1/2 cup or so) and store it in airtight containers for future use.

Print this recipe >>

Monday, March 12, 2012

Stuffed Cucumber Kimchi

This is simple and easy recipe from Maagchi's website. The best thing I like about this recipe is that, I can make it and eat it right away. Below is half portion of the original recipe. I used Kirby cucumbers as they are very crunchy and delicious. I believe this can be served on the side of pretty much any dish from any cuisine.


Stuffed Cucumber Kimchi

Makes: 6 cucumbers
Preparation Time: 15 minutes
Inactive Time: 30 minutes

Ingredients:
6 Kirby/pickling cucumbers - rinsed
2 tablespoons kosher salt
2 tablespoons fish sauce
1/4 cup Korean hot pepper flakes
1 big clove garlic - pressed or finely chopped
1/2 tablespoon sugar
1 cup Asian chives - cut into 1 inch length pieces
1 green onion - diagonally sliced thinly
1/4 cup carrot - shredded
1/4 cup onion - thinly sliced

Directions:
  1. Slit cucumbers in quarter slits lengthwise, leaving about 1/2 inch at the bottom so that whole piece is still intact. Sprinkle kosher salt and mix gently so that all cucumbers are coated with salt. Leave this aside for about 30 minutes.
  2. In a separate large bowl, combine fish sauce, Korean hot pepper flakes, garlic & sugar and mix with spoon to create a paste. Add Asian chives, green onions, carrots and onion to the mixture and mix everything well with a spoon and keep aside.
  3. After 30 minutes, rinse cucumbers with cold water to remove all salt and drain them.
  4. Stuff seasoning paste between slits of each cucumber and keep them in airtight container. You can wear food service gloves to protect your hands during the stuffing process.
  5. Stuffed cucumbers can be served right away or kept in fridge for few days.
Print this recipe >>

Saturday, March 10, 2012

Cabbage and Carrots Stir Fry

This is a very simple dish but is a comfort food for me. I remember eating this as a child and for some reason we never made this when we started living on our own. One day, it just came to my mind and I started carving for it so I made it and paired it up with some curry. While making the dish, I could totally remember how my Mom used to make it and after tasting it, it brings back so much memories and comfort for me that I just love eating it. I love the sweetness of the carrots combined with loads of garlic, egg and black pepper. I can eat this just by itself with some steam rice and it would be heaven for me.
It might not be very special for everyone but it is close to my heart so I thought I’ll share this recipe.


Cabbage and Carrots Stir Fry

Serves: 4
Preparation Time: 5 to 10 minutes
Cooking Time: 5 minutes

Ingredients:

1/2 pound carrots – peeled, cut in half length wise and sliced thinly (about 2 cups worth)
1/2 pound cabbage – sliced into about 1/4 inch slices (about 4 cups worth)
6 cloves of garlic – whack with knife
1 egg
Salt to taste
Black pepper to taste
1 tablespoon oil

Directions:
  1. Heat wok or large pan over high heat until very hot and add oil.
  2. Once it is almost smoking hot, add garlic pieces. Stir once or twice and add carrots. Stir for few more seconds and add cabbage.
  3. Stir well and cover the pan for about 30 seconds. Add salt and generous amount of black pepper to taste and stir well to combine.
  4. Push the vegetables to the side to make space in middle of the pan and crack open an egg in the empty space. Season the egg with few dashes of black pepper, and scramble it. Once the egg is halfway cooked through, mix the vegetables and egg together.
  5. Taste and season with more salt or pepper if needed, stir and serve hot.
Tips for stir frying:
  • Make sure vegetables are well drained and not soaking wet.
  • Have all ingredients ready before starting to cook and work fast to prevent from overcooking the vegetables.
  • Make sure to heat the wok or pan really well to get smoky flavor. 
Print this recipe >>

Thursday, March 8, 2012

Greek Chicken

This is quite easy and quick dish to prepare. You could either put it in skewers and grill or just cook it on a skillet indoors. Pair it up with some Lemon Rice, Tzatziki, Roasted Potatoes, Greek Salad, Hummus and Pita bread and you've got yourself a feast :). Or just chopped it up and put it over Greek Salad and serve with some pita bread as a light meal.


Greek Chicken

Serves: 2
Preparation and Marinating Time: 35 minutes
Cooking Time: 15 minutes

Ingredients:
1 pound boneless skinless chicken breast - sliced into 1/4 inch thick slices
1 tablespoon garlic – pressed or finely chopped
2 tablespoon freshly squeezed lime or lemon juice
1 teaspoon cumin powder
1 teaspoon dry oregano
Salt to taste
Oil spray for cooking

Directions:
  1. Combine chicken with all above ingredients, mix well and let marinate for about 30 minutes.
  2. Spray a large skillet with oil and heat over medium to high heat.
  3. Once the pan is hot; place chicken pieces keeping about 1 inch space in between each piece and cook for about 3 to 4 minutes per side until it is cooked through and browned nicely. You might need to cook in two different batches as you do not want to over crowd the pan. Try not to move the pieces too much while cooking to get even brown color.
  4. Once cooked through, transfer to a plate and serve hot. 
Print this recipe >>

Wednesday, March 7, 2012

Greek Salad

Greek salad is a pretty easy and delicious salad. Since I like sour food, I really like citrus based dressing on salads. It comes together very quickly and you can either serve it as a side dish to a meal or as a meal on its own by adding some Greek chicken and pita bread on side. As a side dish, I like to pair it up with Lemon Rice, Roasted Potatoes, Tzatziki, Greek Chicken and Hummus.

There is really no fixed recipe as you can use as much or as little of the vegetables you like and dress it up to your taste but below is a good start out point.


Greek Salad

Serves: 2 to 4
Preparation Time: 15 minutes

Ingredients:
3 to 4 medium tomatoes - seeds removed and cut into bite size pieces (about 2 cups)
1 green bell pepper - core removed and cut into bite size pieces (about 1 1/2 cups)
3 Persian cucumbers or cucumber of your choice - cut into bite size pieces (about 2 cups worth)
1/2 red onion - cut into bite size pieces (about 1/2 cup)
1/2 cup Kalamata olives - sliced thinly
1/4 cup crumbled feta cheese for garnish

For dressing:
1 tablespoon olive oil
1/3 cup freshly squeezed lime or lemon juice
1 teaspoon dry oregano
Salt to taste
Black pepper to taste

Directions:
  1. Combine all the vegetables in a bowl and keep aside.
  2. In a small bowl, combine all the dressing ingredients and adjust according to taste.
  3. When ready to serve, pour the dressing over the vegetables, to your desire taste, and garnish with feta cheese and serve.
Variations
  • For Vegan friendly version, skip the feta cheese.
Note:
  • Chunkier vegetables taste best for this type of salad. Vegetables and dressing can be prepared ahead but only combine them right before serving. 
  • Peel the cucumber skin if they're not too fresh and seeds can be removed if you prefer.
  • If red onion is very spicy, cut into smaller chunks compared to other vegetables and wash couple times and soak it in cold water while cutting other vegetables. Drain the water out before using.
Print this recipe >>

Tuesday, March 6, 2012

Bhakri


Bhakri is a type of Indian flat bread that is thicker and crispier than other flat breads. My mother-in-law taught me how to prepare these since my husband loves to eat them in breakfast. It is really not difficult to make and we like to make it on weekends and serve as brunch. If serving as breakfast/brunch, it is best to be served with Gur Kari (Gujarati Sweet Mango Pickle), some fried or grilled fresh chili, or chili garlic chutney and Chai. It can also be served as lunch or dinner if paired with daal and some vegetable dish.


Bhakri

Makes: 4
Preparation Time: 15 to 20 minutes
Cooking Time: 15 minutes

Ingredients:
1 1/3 cup atta flour
 1/2 teaspoon salt
1 teaspoon cumin seeds
2 tablespoons oil
1/3 cup + 1 tablespoon water (more if needed)
1/2 teaspoon ghee

Directions:
  1. In a bowl, combine flour, salt, cumin seeds and oil. Mix with hands until oil is incorporated into flour. When you take a handful of flour and form a fist, the mixture should hold its shape.
  2. Add water, little at a time until the dough almost comes together. Knead the dough for a minute or two until everything comes together and can form into a dough ball, adding more water if required. This is not soft dough so it won't be very smooth but should be in one piece without falling apart.
  3. Preheat a skillet or clay pan over medium heat.
  4. Divide the dough into 4 equal portions. Take each portion and with clasped hands, squeeze the dough between your two palms, pressuring on the edges while rotating the dough to form a smooth disk-like shape. Shape all four pieces.
  5. Take one shaped piece and with rolling pin, roll into a circle about 6 inches in diameter and approximately 1/8 inch thickness. It is normal if the edges are not very smooth. 
  6. Place the rolled out dough on the skillet and cook for 1 to 2 minutes per side until some brown spots appear.
  7. If using gas stove, take the cooked Bhakri with a kitchen tong and place it over direct fire over medium heat. Rotate and flip few times and cook over direct fire for 20 to 30 seconds to get more color. If not using gas stove, just continue cooking on the skillet till it is cooked through.
  8. Place it in a plate and with a sharp edge kitchen tong or spoon poke some areas of Bhakri so that ghee can penetrate. Coat the back of a small spoon with ghee and spread it over the Bhakri evenly.
  9. Repeat the rolling and cooking process with the remaining dough and serve either warm or at room temperature with chili garlic chutney (recipe below), Gur Kari(Gujarati Sweet Mango Pickle) and Chai.
Note: To save time, while you’re cooking one Bhakri work on rolling the other.

Chili Garlic Chutney
1 big Jalapeno
2 cloves garlic
3/4 tablespoon oil
Salt to taste

Process jalapeno and garlic in food processor until fine or chop it up with knife very finely. Transfer to a small bowl, add oil and salt. Mix it up and serve.

Print this recipe >>

Saturday, March 3, 2012

Shan Khauk Swe (Shan Noodles)

Shan is one of the states in Burma bordering China, Thai and Laos. Their regional food has different types of noodles that are well known throughout the country. This dish is originally from there but I got to taste it when my sister was visiting us and she cooked for us. We loved it so much that I have been making this few times after her visit.

There are different versions of this dish and is usually served with some chicken broth soup and sour mustard greens. This is a dry version and I usually eat it by itself as it does taste pretty good on its own. During her time living in Loikaw (capital of Kayah State, neighboring state of Shan), my sister got this recipe from a lady that sells these noodles.

Recipe updated: Apr 10, 2012
Amount of Red Chili Powder used has been updated.


Shan Khauk Swè (Shan Noodles)

Serves: 4
Preparation Time: 40 minutes
Cooking Time: 30 minutes

Ingredients:
For Gravy

2 pounds Tomatoes – slit a cross-shape just through the skin with a sharp knife, at the bottom of each tomato
1 teaspoon Salt
1 pound Boneless Skinless Chicken Breast
3 tablespoon Soy Sauce (adjust to taste)
3 tablespoon Oil
8 cloves of Garlic – crushed or finely chopped (about 2 tablespoons)
1/8 teaspoon Turmeric Powder
4 teaspoons Red Chili Powder (adjust to taste)
2 tablespoons Tomato Paste
2 teaspoon Fish Sauce (adjust to taste)

Other Ingredients:
1 pound fresh Vietnamese Flat Rice Stick Noodle (Banh Pho)
1/2 pound Chinese Greens (Yu Choy) – discard few inches off the bottom; cut into 2 inch pieces and wash well
1/2 cup Roasted Peanuts – coarsely grounded
4 teaspoons Soy Sauce (adjust to taste)

Directions:
  1. In a pot big enough to fit all the tomatoes; fill it with 1 cup of water and add salt. Stir and add the tomatoes, cover the pot and bring it to a boil. Once water comes to a boil, cook for about a minute or two, just to loosen up the skin but not to cook the tomatoes.  Remove from heat, pour out the water and leave the tomatoes to cool uncovered.
  2. Meanwhile, chop the chicken into as small as you can or about less than 1/4 inch pieces. It will look almost like minced chicken. Add 2 tbsp of soy sauce mix well and keep aside. (I find that partially frozen chicken is easier to work with when chopping it.)
  3. When the tomatoes are cool, remove the skin and discard. Cut the tomatoes in half and remove as much seeds as possible without removing any pulp. Discard the seeds, chop the tomatoes finely and keep aside.
  4. Heat a pot with oil over medium heat. Once hot, add garlic, turmeric powder, chili powder and cook for few seconds till fragrant. Be careful not to burn the garlic.
  5. Add chicken, increase heat to high and cook stirring frequently until all chicken pieces turns opaque and it starts to release water. Stir for few more seconds and add chopped tomatoes, tomato paste, fish sauce and the remaining 1 tbsp of soy sauce.
  6. Stirring occasionally, cover and cook over medium heat for about 10 to 15 minutes until all tomatoes are crushed and the oil starts to separate from gravy. You should not need any water but if it is too dry, add some water. Turn off the heat and is ready to be served.
How to serve:
Have all ingredients ready before serving. You will have to work with one serving batch at a time.
  1. Bring a pot of water to a boil. The pot should be big or deep enough with enough water for noodles to be dipped in with a noodle-strainer or any strainer that you will be using.
  2. Once water comes to a boil, place a handful of Chinese greens into the strainer and dip the strainer in the boiling water for about 10 to 20 seconds for the greens to wilt.
  3. Remove strainer from water, place a big handful of noodles into the strainer. Dip the strainer in boiling water for 3 to 5 seconds. Noodles will cook right away and you don’t want to overcook them, so work quickly.
  4. Place the cooked noodles along with the greens to a serving bowl. Ladle couple scoops of chicken gravy on top. Top it up with peanuts, crushed chili and 1 tsp of soy sauce (adjust to taste) and serve immediately.
  5. Mix everything before eating.
Note:
  • If you cannot find the fresh noodles, dry noodles will work as well. Soak them in cold water for couple hours and cook as mentioned above.
  • Since vegetables take little longer than noodles, start with vegetables and add noodles. However, they both can be cooked separately but having vegetables at the base while cooking noodles will help with not overcooking the noodles. 
  • If noodles are all over the place and not able to fit neatly into the strainer while cooking, remove from boiling water and make sure that they are not dipped into water while gathering them.  
  • Make gravy spicy enough so that you don’t need to add more chili at the time of serving. If not, serve with toasted crushed red pepper.
Print this recipe >>