Wednesday, February 29, 2012

Baked Pakoras

Pakoras are fried snacks made from Basen (gram flour) batter. You can use a variety of vegetables such as potato, onions, cauliflower or some of the leafy greens; dip them in batter and deep fry them until lightly golden and crisp. My Mom used to make super delicious Pakoras with water spinach (Ong Choy, Ga Zun Ywet). She did not use that many ingredients or spices but they still tasted really good. 

    “A book, a cup of hot steaming tea and some pakoras.........a perfect combination for a rainy day”
     -- Kawser Patel

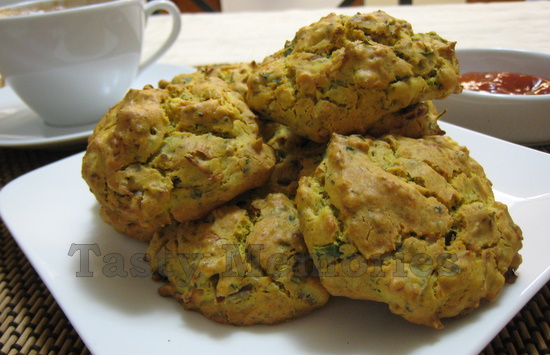
Few days back, the weather was so gloomy and cold that I could not think of anything else other than eating hot Pakoras. The only drawback for me with Pakoras is the frying process but I found this baked version online which is a good compromise.  The difference between the fried and baked version is the batter consistency. The fried version has thinner pancake-like batter and baked version has a pretty thick, almost cookie dough-like batter. My Mother-in-law likes to spice up her Pakoras so I’m following that concept and spicing up these baked Pakoras but you can use as many or little variety of spices you like depending on what you have on hand and your taste.


Baked Pakoras

Serves: 2
Preparation Time: 15 minutes
Cooking Time: 20 minutes

Ingredients:
1 cup besan (gram flour, chickpea flour)
2 tablespoons rice flour
3/4 teaspoon baking powder
1/2 teaspoon chili powder (adjust to taste)
1/2 teaspoon coriander powder
1/8 teaspoon turmeric powder
1/2 teaspoon fennel seeds
1/2 teaspoon ajwain/carom seeds (optional)
2 tablespoon dried fenugreek leaves/methi leaves (optional)
Salt and pepper to taste
1 tablespoon ghee or melted butter
1 tablespoon oil
1 cup red onion – finely chopped
1 Serrano pepper or any green chili – finely chopped (adjust to taste)
1 tablespoon cilantro – finely chopped
1/3 cup + 1 tablespoon water (plus more if required)
Oil spray

Directions:
  1. Preheat oven to 400 degree Fahrenheit. Line a baking sheet with foil and lightly coat it with oil spray.
  2. In a bowl, combine all ingredients except water and mix with a spoon or rubber spatula. While stirring, add water little at a time just until all flour is wet without any dry patches. You should be able to scoop out with spoon on baking sheet.
  3. Drop about 1 tablespoon of batter onto the prepared baking sheet spacing about 2 inches between each Pakoras.
  4. Bake the Pakoras for about 20 minutes or until lightly golden in color. Serve hot with Ketchup and Masala Chai.
Note: I used toaster oven in making these as it cooks much faster. If you’re using conventional oven, you might have to bake for a bit longer.

Print this recipe >>

Monday, February 27, 2012

Paneer

Paneer is an Indian cheese which can be used for making different types of curries and dishes. Making Paneer at home is not that difficult and by making it at home, you can even flavor it with herbs and spices if you would like.


Paneer
Makes: 10 ounces
Cooking Time: 15 minutes
Preparation and Pressing Time: 1 hour and 15 minutes

Ingredients:

8 cups whole or 2% milk
3 tablespoon vinegar or lemon juice

Directions:
  1. In a heavy bottom pot over medium high heat, boil milk stirring frequently to prevent scorching at the bottom of the pot.
  2. Once it comes to a boil, reduce heat to low and add vinegar or lime slowly, stirring gently. Within few seconds, the milk solids will start to separate from whey.  Once the whey is clear, turn of the heat, remove from stove keep aside for 2 to 3 minutes.
  3. Drain the whey using a strainer lined with cheesecloth or muslin cloth.
  4. Run this under cold tab water to wash out the sourness. Gather all sides of the cloth to form a little bundle and squeeze excess water out.
  5. Shape the bundle into round, rectangle or square shape, smooth out the cloth (wrapping with as less crease as possible) and put it on a plate or tray.
  6. Paneer will need to be pressed with something heavy for about an hour. This can be done by placing a pot filled with water on top of the wrapped cheese and leave it for an hour or place another plate on top of the wrapped bundle and place some cans to weigh it down.
  7. After pressing it for about an hour, paneer is ready to be cut into desired shape and use.
Note:
  • Before adding vinegar or lime into milk, the milk can be flavored with salt and dried spices and herbs such as cumin seeds, dried mint and cilantro, if desired.
  • If you have a strainer with a flat bottom, invert this and place the paneer bundle on top of it and press with some weight as mentioned above. This method will let the water drain out but you can still make it without this.
Print this recipe >>

Mattar Paneer

Mattar Paneer is a popular Punjabi (northern state in India) dish. This is the version from Vahrehvah website. It is easy to make, rich, creamy and packed with flavor. Best to be served with naan, Jeera rice, some fresh vegetables and sweet lassi drink.


Mattar Paneer

Serves: 4
Preparation Time: 30 minutes
Cooking Time: 35 minutes

Ingredients:
10 whole cashew nuts
1 onion – roughly chopped (about 2 cups)
1/2 teaspoon turmeric powder
1 tablespoon ginger – roughly chopped
1 tablespoon garlic – roughly chopped
2 medium tomatoes – roughly chopped (about 1 1/2 cup)
Whole spices – (2 bay leaves, 1 cinnamon stick, 3 cloves, 3 cardamom pods, 2 teaspoon cumin seeds)
2 green chilies – finely chopped (adjust to taste)
1 teaspoon cumin powder
1 teaspoon coriander powder
1/2 teaspoon red chili powder
1 tablespoon dried fenugreek leaves (optional)
1 cup green peas
10 ounces paneer (homemade or store bought) – cut into 1" cubes
1/4 cup cilantro – roughly chopped
1/4 cup heavy cream (optional)
1/2 teaspoon Garam Masala powder (optional)
2 tablespoon oil
Salt to taste

Directions:
  1. Heat a pan or pot over medium high heat; add 1 tbsp of oil and sauté cashew nuts until they are slightly golden in color.
  2. Add onions, a pinch of salt and cook until onions are lightly brown, about 4 to 5 minutes.
  3. Add turmeric powder, ginger, garlic and cook for further minute.
  4. Add tomatoes and cook until tomatoes are soft, for about 4 to 5 minutes. Remove from heat, let it cool and blend it into a smooth paste and keep aside.
  5. Using the same pan or pot, heat the remaining 1 tbsp of oil over medium high heat and add whole spices. Fry for 30 seconds and add the above blended mixture.
  6. Add about 1 1/2 to 2 cups of water to thin out the gravy and add green chili, cumin powder, coriander powder, chili powder and salt to taste. Stir and bring the mixture to a boil and cook for 10 minutes on low heat uncovered.
  7. Add fenugreek leaves crushing between the palms while adding, mix well and cook for further 5 minutes partially covered.
  8. Add green peas and cook for another 5 minutes.
  9. Add paneer and simmer for two minutes. Make necessary adjustments to taste and thickness of the gravy by adding more water if needed.
  10. Garnish with chopped cilantro, cream, Garam Masala powder, stir gently and simmer for a minute more and serve hot with naan.
Note: If desired, paneer cubes can be deep fried until golden brown before adding into the gravy.

Print this recipe >>

Friday, February 24, 2012

Galbi (Korean Short Ribs BBQ)

I like a lot of barbeque dishes and Galbi is no different. I like to pair it with some Japchae, and some of the Korean side dishes, depending on how much time I have on hand. I’m using Maangchi’s recipe with few more ingredients added. I love the dipping sauce she made which goes really well when spread over rice noodle roll sheets, and wrapped with some meat and vegetables. It is always good to marinate meat overnight but if you are short of time, few hours of marinating will do as well. I like to buy the boneless short ribs from Costco. I like this cut because it is well marbled which produce tender meat at the end and boneless just makes it a bit easier to eat.


Galbi (Korean Short Ribs BBQ)

Serves: 4 to 6
Preparation Time: 30 minutes
Cooking Time: 30 minutes
Marinating Time: Preferably overnight

Ingredients:
4 pounds boneless beef chuck short ribs – excess fat removed and cut into 1/4 inch thick and 5 to 6 inches in length
1 large Asian pear
9 cloves garlic
1/2 Onion (about 1 cup) – cut into chunks
1 teaspoon ginger – roughly chopped
1/3 cup soy sauce
1/3 cup water
1/3 cup Chinese rice wine (cooking wine)
1/4 cup honey
1 teaspoon ground black pepper
3 tablespoon sesame oil
2 tablespoon sesame seeds
1 tablespoon crushed red pepper (optional)
4 green onions – thinly sliced

Directions:
  1. Wash the beef couple times under cold water, drain and keep it in a large container or pot.
  2. With your food processor or blender, grind pear, garlic, onion and ginger into a fine paste and transfer to a clean large bowl.
  3. To this bowl, add the remaining ingredients and mix well. Pour this marinate over the beef, mix well and let it marinate in the fridge, covered for overnight.
  4. When ready to grill, remove the meat from refrigerator 30 minutes before grilling and grill on high heat for your desired doneness, approximately 2 minutes per side or more.
  5. Serve the meat as a wrap with ingredients such as lettuce, chunks of cucumber, carrots, green chili, rice noodle roll sheet and dipping sauce (recipe below) or serve with some steam rice, Japchae, grill vegetables and cucumber kimchi.
Dipping Sauce
Ingredients:
2 tablespoon soy bean paste (fermented bean paste, Doenjang)
1 tablespoon Korean hot pepper paste (Gochujang)
1 green onion – thinly sliced
1 clove garlic – pressed or finely chopped
1 teaspoon honey
1 teaspoon sesame oil
1 teaspoon toasted sesame seeds

Directions:
  1. Combine all ingredients in a small bowl, mix well and serve.
Print this recipe >>

Thursday, February 23, 2012

Japchae (Korean Stir Fried Noodles)

I started eating Korean food only after moving to California and love it ever since. I like the BBQ and most of the side dishes offered in Korean restaurants. This noodle is one of my favorite dishes that I've tried. Few years back when I was a little obsessed with Korean food, I started looking for Korean recipes online and found this Maangchi's website which I absolutely love. I've tried many of her dishes and love them all.

This noodle is a must have for us whenever we do Korean BBQ. Since I always pair it with Korean BBQ, I just take some of the marinated meat from BBQ, slice it thin and use it for this dish.


Japchae (Korean Stir Fried Noodles)

Serves: 4 as a meal or 8 as a side dish
Preparation Time: 30 minutes
Cooking Time: 30 minutes

Ingredients:
12 ounces Korean starch noodles (Dangmyun)
1 bunch spinach (about 1 pound) – cut off the roots
1 medium carrot – cut into matchstick size pieces (about 1 cup)
1 medium onion – sliced into 1/8 inch thick slices (about 1 cup)
1 packet of white button mushrooms – thinly sliced (about 2 cups)
8 green onions – cut into 3 inch length pieces
5 ounces (approx. 1/3 lb) beef – thinly sliced
5 dried shitake mushrooms – soaked in warm water for 30 minutes or until soften, squeeze out water and thinly sliced
3 cloves of garlic – pressed or finely chopped
4 tablespoons soy sauce (adjust to taste)
3 1/2 tablespoon sesame oil
3 1/2 tablespoon sugar (adjust to taste)
Black pepper to taste
1 tablespoon toasted sesame seeds
5 teaspoons olive or vegetable oil for cooking the vegetables

Directions:
  1. Boil the noodles per package instruction till tender, drain and place it in a large bowl. Cut it up several times using scissors and season it with 1 tbsp of soy sauce, 1 tbsp of sesame oil. Mix well and keep aside.
  2. Place spinach in a pot of boiling water and cook just until wilted, for about half a minute. Drain and rinse under cold water few times, removing any grit or dead leaves along the way. (You can use the same water for boiling noodles to cook the spinach). Squeeze out excess water and cut into about 2 inch pieces. Season it with 1/2 tbsp soy sauce, 1/2 tbsp sesame oil, mix and place it in the noodle bowl.
  3. Heat a large skillet over high heat. Once hot, add a splash (about 1 tsp) of olive/vegetable oil and stir fry the carrots for about half a minute and transfer them to the noodle bowl.
  4. Heat the same skillet with a splash more of oil and stir fry the onions until translucent and transfer to the noodle bowl.
  5. Do the same with white mushrooms, stir frying them until lightly golden and transfer to the noodle bowl.
  6. Repeat again with green onions and cook for about a minute and transfer to the noodle bowl.
  7. Heat the same skillet again with a splash more oil and add beef, shitake mushrooms and stir fry for few minutes until the meat is cooked through. Add garlic, 1/2 tbsp soy sauce, 1/2 tbsp sugar, stir well and cook for about half a minute more and transfer to the noodle bowl.
  8. Add 2 tbsp soy sauce, 3 tbsp sugar, 2 tbsp sesame oil, black pepper to the noodle bowl. Mix everything up very well and adjust according to taste. Garnish with toasted sesame seeds and serve.
Note:
  • Precut all the vegetables before stir frying so that you can cook continuously while stir frying.
  • Keep the heat to maximum and make sure the skillet is well heated while stir frying the vegetables.
Print this recipe >>

Tuesday, February 21, 2012

Lasan Puri (Garlic Puri)

The garlic flavored Puri is a great dish for breakfast and brunch. The procedure of making the Lasan Puri is same as making regular Puris except this is flavored with spices and garlic. It can be a meal on its own without any gravy or curries accompanying it. I believe it is a common Gujarati (eastern state in India) dish and I was introduced to this dish by my husband’s family, and learnt how to make them from my mother-in-law.

I love to eat Puris but we don’t make or eat as much because they are deep fried. I have to admit, I have difficulty in making the Puri’s puff 100% of the time but with a little practice, I’m getting a hang of it. Even if some of them don’t puffed up, the taste is still great. Fry the Puris with enough oil and maintain the temperature for successful Puris.


Lasan Puri (Garlic Puri)

Makes: 22 puris
Preparation Time: 30- 40 minutes
Frying Time: 25 minutes

Ingredients:
2 cups atta flour
1 teaspoon ajwain (carom seeds)
1/2 teaspoon salt
1/2 teaspoon turmeric powder
1 1/2 teaspoon chili powder
2 tablespoon garlic – crushed or finely chopped
2 tablespoon oil
3/4 cup water (more if required)
Oil for deep frying

Directions:
  1. In a large bowl, mix first 6 ingredients together. Add oil and mix with hand until oil is incorporated into flour. It will look like wet flour or coarse bread crumbs and when you pressed flour in your fist, it should partially hold the shape.
  2. Add water little at a time until the dough comes together. The dough should be little tight and not very soft, so be careful not to add too much water.
  3. Knead the dough for 2 to 3 minutes until it is smooth. Divide the dough into 22 equal portions and shape them into smooth balls.
  4. Heat deep frying pan with few inches of oil over medium heat, to 325 to 350 degrees Fahrenheit.
  5. Take each dough ball and roll out into thin circles about 4 inches in diameter. You should be able to roll out without dusting any flour if the dough is at right consistency. However, if the dough has more water than needed and it is sticking to the surface, you can dust some flour while rolling.
  6. Roll few and keep in a plate in one layer while the oil is heating. (Keep the unrolled dough balls covered with a plate or towel.)
  7. Once the oil is hot slide one puri at a time in hot oil. It will initially sink to the bottom of the pan but within few seconds, it should rise up. With a slotted spoon, lightly press the puris so that it puffs up. Once puffed, turn over and fry the other side for few more seconds until very lightly golden in color on both sides. Remove from oil and place it on a large plate or pot lined with paper napkins for oil to drain.
  8.  Fry all the puris and serve hot with Gur Kari (Gujarati Sweet Mango Pickle), Chai and fried Jalapeno peppers (see note below).
Note: To make fried Jalapeno; cut 1 to 2 big Jalapeno peppers into 1 inch chunks. Deep-fry in the same oil for few seconds until lightly golden in color. Remove from oil, drain on paper napkins and season with some salt, and coriander powder to taste.

Print this recipe >>

Friday, February 17, 2012

Aloo Puri

Aloo and Puri goes together like love and marriage ;). It is just a perfect combination. My mom used to make super delicious Aloo Puri for us and we all loved it. She also made Kheer along with this meal but since I'm not too crazy about Kheer, I've never made it before. She usually made the puri out of atta flour, which produces softer puris but since my husband likes little chewer version, I use mixture of all purpose flour and atta to make them. The Aloo subzi has a little tangy flavor from tamarind and good aroma from black onion seeds. This is fairly an easy dish but does require deep frying the puris.


Aloo Subzi

Serves: 2 to 3
Preparation Time: 20 minutes
Cooking Time: 25 minutes

Ingredients:
2 tablespoon oil
1 teaspoon brown whole mustard seed (rai)
1 teaspoon black onion seed (kalonji/kala zeera)
1/4 teaspoon hing (optional)
1 1/2 cup of onion - finely chopped
1 teaspoon ginger - grated or finely chopped
1 teaspoon garlic - crushed or finely chopped
1 teaspoon turmeric powder
1 1/2 pounds potato - diced into 1/2 inch pieces
1/4 cup tamarind (adjust to taste)
Salt to taste

Directions:
  1. To make tamarind pulp, in a small bowl, soak tamarind in enough lukewarm water to cover it. Let it sit for about 20 to 30 minutes to soften. With your hand squash and squeeze the tamarind so that it mixes well with water. Strain, discard the solids and keep aside the liquid/pulp for later use.
  2. In a pot, add oil and heat over high heat. Once it is hot, add mustard seeds, black onion seeds and hing. Fry for few seconds until the mustard seeds start to pop. Add chopped onion, a pinch of salt and stir well.
  3. Fry the onions, stirring occasionally for 3 to 4 minutes until they are lightly golden in color.
  4. Add ginger, garlic, turmeric powder and stir for few seconds.
  5. Add potatoes, salt to taste, stir well and cook for about a minute.
  6. Add about 1 1/3 cup of water or enough water to cover the potatoes, reduce heat to medium, cover the pot and cook for 12 to 15 minutes until potatoes are cooked through and soft. It is okay for some of the potatoes to be little mashed as this will create thicker gravy.
  7. Add tamarind pulp (2 tablespoon or to taste), more water if required (about 2/3 cup), stir and cook for further 2 to 3 minutes. Make necessary adjustment to taste and consistency of the gravy by adding more water if required. Serve hot with fresh puris.
Note:
  • I prefer using tamarind for this dish but you can substitute it with lime juice as well.
  • Amount of tamarind used for this dish will depend on the sourness of the tamarind itself and the amount of water used in making the pulp. Add few teaspoons at a time and adjust according to your desired sourness of the dish.
  • Unused tamarind pulp can be frozen in ice cubes trays and store the cubes in Ziploc bag or airtight container in freezer for few months.
Puri

Makes: 16 puris
Preparation and frying Time: 30 minutes
Dough resting Time: 30 minutes

Ingredients:
1 1/2 cup all purpose flour
1/2 cup atta flour
1/2 teaspoon salt
2 tablespoon oil
1/4 cup milk
1/3 cup water (more if required)
Oil for deep frying

Directions:
  1. In a large bowl, mix all purpose flour, atta flour and salt together. Add oil and mix with hand until oil is incorporated into flour. It will look like wet flour or coarse bread crumbs and when you pressed flour in your fist, it should partially hold the shape.
  2. Add milk to the flour mixture and start by adding half of the water and continue to add more until the dough comes together. The dough should be little tight and not very soft, so be careful not to add too much water.
  3. Knead the dough for 2 to 3 minutes until it is smooth.
  4. Lightly coat the kneaded dough with oil, cover and keep aside for about 30 minutes or so. Tip: While dough is resting, prepare Aloo Subzi.
  5. Once ready to make the puris, divide the dough into 16 equal portions and roll them into smooth balls.
  6. Heat deep frying pan with few inches of oil over medium heat, to 325 to 350 degrees Fahrenheit.
  7. Prepare a large plate or pot by lining it with some paper napkins to keep the fried puris and keep this aside.
  8. Take each dough ball and roll out into thin circles about 4 1/2 to 5 inches in diameter. You should be able to roll out without dusting any flour if the dough is at right consistency. However, if the dough has more water than needed and it is sticking to the surface, you can dust some flour while rolling.
  9. Roll few and keep in a plate in one layer while the oil is heating. (Keep the unrolled dough balls covered with a plate or towel.)
  10. Once the oil is hot slide one puri at a time in hot oil. It will initially sink to the bottom of the pan but within few seconds, it should rise up. With a slotted spoon, lightly press the puris so that it puffs up. Once puffed, turn over and fry the other side for few more seconds until very lightly golden in color on both sides and remove from oil. Fry all the puris and serve hot with Aloo subzi.
Note:
  • Having a second hand in making puris will be very helpful. While one person rolls, the other person can do the frying process. Before starting the frying process, have 5 to 6 puris rolled out ahead of time.
  • If you're making it alone, just work in few batches rolling and frying 5 to 6 puris at a time. While you're rolling, just reduce the heat of the oil a little to maintain the temperature.
Print this recipe >>

Wednesday, February 15, 2012

Thai Grill Beef Salad

This is one my favorite salads. The taste and ingredients used in the dressing is very similar to the Thai dish 'Larb' that my dad used to cook for us when we were kids. You can serve the salad by itself as a light meal; serve it as a side dish to a meal or serve it with steam rice as a meal on its own.


Thai Grill Beef Salad

Serves: 2 to 4
Preparation Time: 15 to 20 minutes
Cooking Time: 10 to 15 minutes
Marinate time: 30 minutes

Ingredients:
For Marinate:

2 – 1 inch thick, boneless New York strip steaks – fat removed and poked with fork all over
2 cloves garlic – crushed
1 teaspoon ginger – grated
1 tablespoon light soya sauce
3 tablespoons rice vinegar
3 tablespoons Chinese rice wine, cooking wine
1 teaspoon sugar or grated palm sugar
Salt and ground black pepper to taste

Salad Dressing:
1/3 cup shallots, thinly sliced
1/3 cup cilantro, roughly chopped
1/3 cup mint, roughly chopped
1 tablespoon or to taste crushed red chili pepper – toasted (toast chili pepper in a small skillet on low heat until fragrant)
1 tablespoon uncooked sweet rice – lightly toasted on a skillet and grinded to a coarse powder
2 tablespoon fish sauce (adjust to taste)
1 tablespoon sugar or grated palm sugar (adjust to taste)
Juice of 1 to 2 limes (adjust to taste)

Other ingredients:

2 medium tomatoes, thinly sliced
2 medium cucumbers, thinly sliced
2 handfuls of romaine lettuce, roughly chopped

Directions:
  1. Mix all marinate ingredients except for beef in a small bowl and adjust according to taste. Coat both sides of the beef with this mixture in a shallow dish and let it marinate for about 30 minutes or so.
  2. Mix all salad ingredients in a bowl and adjust according to taste and keep aside.
  3. Heat a griddle skillet pan or a skillet on high heat until the pan is hot. Spray with oil and cook the steaks on high heat for about 3 minutes on each side to get color.
  4. Reduce heat and cook till your desire doneness. For a little well done meat, after reducing the heat, cover the pan halfway and let it cook through.
  5. When done, transfer the meat to a plate, cover loosely with foil and let it rest for 5 minutes before slicing the meat into thin strips.
  6. To serve, add tomato, cucumber and lettuce in a big mixing bowl and add half of the salad dressing. Toss well and transfer to a serving platter. Top it up with sliced beef and pour more dressing on top. Serve with steam rice.
Print this recipe >>

Saturday, February 11, 2012

Kheema Paratha (Ground Meat Stuffed Flatbread)

Kheema Paratha is basically a flat-bread that is stuffed with ground meat mixture. In Burma, when we use the word Paratha, we are referring to flour based (instead of whole wheat) flaky, layered and crispy type of Paratha, also known as Lacha Paratha or Roti Canai in some other parts of the world :). It is mostly sold by road-side vendors and usually in the evenings, people either set up cooking area in-front of their restaurants or just in some corner of the road and start making and selling these. There are different varieties of fillings that you can order but the meat filling is mostly made with beef. You can choose from meat only, meat and egg or egg only. The meat version goes really well with some sour salad or even with just a wedge of lime. Sometimes, I like to order egg only version and sprinkle some sugar on top or spread condensed milk and eat it as a sweet dish.

Back home, people usually don’t make these at home mainly because it requires some skill in making these types of Parathas. Not only does the dough need to be quite smooth and elastic but the actual technique of pulling the dough paper-thin, requires some skills. It is certainly not impossible to make it at home, but back then at that time; when fresh Parathas are so readily available, why would anyone bother making them at home :).

That being said, now that I’m living in a totally different environment, I would love to make these from scratch one day. For now, I’m using the frozen Parathas and so far they have worked out pretty well for me. I don’t like to use oil when cooking the Parathas because I think the frozen Parathas already have enough oil in them. The filling used here is pretty versatile and can be used to fill; puff pastries, Samosas or spring rolls. I’ve used ground turkey below but you can make with any type of ground meat; such as, chicken, beef or lamb. However, you might have to use more or less spices depending of the type of meat used.


Kheema Paratha

Makes: 6 Paratha
Preparation Time: 40 minutes
Cooking Time: 40 to 45 minutes

Ingredients:
1 pound ground turkey
1 teaspoon chili powder
1/4 teaspoon turmeric powder
Salt to taste
1 tablespoon oil
5 cloves (about 1 tablespoon) garlic – crushed or finely chopped
1 tablespoon ginger – grated or finely chopped
Black pepper to taste
1/2 cup cilantro – finely chopped
1/2 cup mint – finely chopped
1 Jalapeno or any green chili – finely chopped (adjust to taste)
1/2 cup red onion – finely chopped
6 frozen uncooked plain Paratha (I use, Kawan brand) – keep at room temperature in one layer for about 15 minutes before using

Directions:
Filling

  1. Combine ground turkey with chili powder, turmeric powder, salt, mix well and keep aside.
  2. Heat oil in a wide pan over high heat, and add garlic and ginger. Stir for few seconds and be careful not to let it burn.
  3. Add ground turkey mixture and stir well to combine. Stir frequently and break up the meat with spatula to prevent big lumps. Continue to cook on high heat until the meat starts to brown.
  4. Add black pepper at this point and make necessary adjustments according to taste. Stir for few more seconds and turn of the heat and remove pan from the heat.
  5. Add chopped cilantro, mint and jalapeno and mix well to combine.
  6. When the meat mixture is quite warm but not hot anymore, add the chopped onion and mix well. Let this mixture cool completely before warping in the Parathas.
Wrapping and cooking the Parathas
  1. On a smooth surface or countertop, place one Paratha and roll it out as thin as you can without breaking or tearing approximately about 11 inches in diameter. (I use the back of a round tray as surface for rolling the Parathas.)
  2. Place about 1/2 cup of filling in the middle of the rolled Paratha and shape the filling into approximately 5 x 6 inch rectangle.
  3. Fold over the bottom and top of the Paratha circle to the center. Fold over the sides to the center as well. You will end up with a rectangle shaped Paratha at this point.
  4. Place the Paratha on a sheet of plastic that comes with the Paratha package, keep aside or in fridge while wrapping the remaining Parathas.
  5. Heat a nonstick skillet over medium to medium low heat. Place one paratha, seam side down and cook for about 5 minutes in total flipping once or twice until both sides are golden brown in color and crispy.
  6. Keep the cooked Paratha on a wire rack in a warm place. Continue to cook the rest of the Parathas and serve hot with wedges of lime and onion salad.
Note:
  • You can also add an egg during the wrapping process. After placing the filling in the center, crack one egg open and lightly spread the egg with a fork over the filing. Wrap the Paratha as stated above and cook.
  • While cooking the Parathas, sometimes, I like to open up the top folds, and brown the inner side for few minutes and fold back to its shape so that it can thoroughly cook inside.
  • If frozen Paratha are too hard and breaks when you roll, leave it out few minutes longer for easier rolling. If they are out too long, it will be too soft, so put back in fridge or freezer to chill them a bit. 
  • You can lightly grease the work surface if Parathas are sticking or too soft.
 Print this recipe >>

Wednesday, February 8, 2012

Mahi Mahi Tacos

Mahi Mahi is a very flavorful and meaty fish. Since we did not really use this fish back home, I was looking online for different ways of preparing this fish. I came across a Taco recipe few years back and really enjoyed eating them. This is just a perfect combination of all the flavors and I love the idea of using Nectarine in making salsa. I didn’t modify this recipe much other than using smoked paprika instead of cayenne and leaving out avocado in salsa; mainly because I always forget to buy it :).


Mahi Mahi Tacos

Serves: 4
Preparation Time: 30 minutes
Cooking Time: 10 to 15 minutes

Ingredients:
Spice Mix
1 1/2 teaspoons kosher salt
1 teaspoon ground cumin
1/4 teaspoon dried oregano
1/8 teaspoon garlic powder
1/8 teaspoon freshly ground black pepper
1/8 teaspoon smoked paprika

Other Ingredients:
4 (4-ounce) mahi mahi fillets
Oil spray
12 corn tortillas
Nectarine salsa (recipe follows)
Zesty sour cream (recipe follows)

Directions:
  1. Combine spice mix ingredients in a bowl and mix well to combine. Sprinkle this evenly over both sides of the fish and keep aside.
  2. Spray some oil on a skillet and heat it over medium heat. Once it is hot, place the fish and cook for 4 to 5 minutes per side until the fish is cooked through. Remove from heat, break it in few chunks and keep aside.
  3. In a separate skillet over medium heat, heat the tortillas few seconds per side until warm.
  4. To serve, fill each tortilla with chunks of fish and top it up with Nectarine salsa and Zesty sour cream.
Nectarine Salsa
Ingredients:
2 cups nectarine – diced
1/2 cup red bell pepper – chopped
1/4 cup red onion – finely chopped
Few sprigs of cilantro – finely chopped
1 1/2 tablespoons fresh lime juice (adjust to taste)
1/2 jalapeno – finely chopped (adjust to taste)
1 clove of garlic – crushed or finely chopped
Salt to taste

Directions:
  1. Combine all ingredients in a bowl, adjust according to taste and serve chilled. 
Zesty Sour Cream 
Ingredients:
1 cup sour cream
Few sprigs of cilantro – finely chopped
2 tablespoons fresh lime juice
Zest of 1 lime
1 teaspoon hot sauce of your choice
Salt to taste

Directions:
  1. Combine all ingredients in a bowl, adjust according to taste and serve chilled. 
Print this recipe >>

Tuesday, February 7, 2012

Raita (Yogurt Sauce)

Raita is a mixture of yogurt with vegetables and is often served as a side dish to an Indian meal. By paring with hot and spicy curries and grilled meat, it will cool down and balance out the strong flavors of the meal.

The choice of vegetables used and the size of cutting them will depend on your preference. I usually like my vegetables to be little chunkier and below is the version that I like to make. Once in a blue moon, I might add some red onion or green onion but usually I just skip it because I don’t like the after taste of raw onion.


Raita (Yogurt Sauce)

Ingredients:
1/2 cup plain yogurt
1/4 cup water
1/4 cup Persian cucumber or cucumber of your choice – diced into 1/2 inch pieces
1/4 cup carrot – diced into 1/4 inch pieces
1/2 jalapeño – seeds removed and diced into 1/4 inch pieces (adjust to taste)
3 to 4 sprigs of cilantro – roughly chopped
3 to 4 mint leaves – roughly chopped (optional)
1/4 teaspoon toasted cumin powder
1 tablespoon golden raisins – roughly chopped
Salt to taste
Few dashes of black pepper

Directions:
  1. Add yogurt in bowl and stir with a fork or whisk so that it is smooth and creamy. Add water and stir well to combine. Depending on the yogurt, you might need more or less water. Adjust to your desired consistency.
  2. Add the remaining ingredients, mix well and adjust according to taste.
  3. Serve slightly chilled.
Note: You can also add little bit of red onion or green onion if you prefer.

Print this recipe >>

Monday, February 6, 2012

Jeera Rice (Cumin Rice)

Jeera Rice is really simple, delicious and fragrant rice. It goes well with Indian curries and Indian BBQ. This is a very basic recipe using only few ingredients but I’ve seen recipes that use saffron and herbs in it. I’ll post different version in future when I make it :).

Water to rice ratio in cooking rice will depend on whether it is old or new crop. If you’re already comfortable with cooking rice, just use the same ratio as you would normally use. I’ve included both rice cooker and stove top methods below.


Jeera Rice (Cumin Rice)

Serves: 2 to 4
Preparation Time: 5 minutes
Cooking Time: 25 minutes

Ingredients:
1 cup basmati rice
1 teaspoon ghee or butter
1 1/2 teaspoon cumin seeds
1 3/4 cup water
Salt to taste

Directions:
Rice Cooker Method
  1. Wash the rice few times, drain and place it in rice cooker pot.
  2. In a small skillet, add ghee and heat over medium high heat.
  3. Once ghee is hot but not smoking, add cumin seeds. Fry for few seconds until fragrant and the cumin turns few shades darker. Be careful not to let it burn.
  4. Remove from heat and pour it over the rice. Add salt and stir with a spoon to mix all ingredients well.
  5. Add water to little over 1 cup mark in the cooker or 1 3/4 cup and cook.
  6. Before serving, fluff up the rice a bit.
Stove-top Method
  1. Wash the rice few times, drain and keep aside.
  2. In a pot to cook rice, heat ghee over medium high heat.
  3. Once ghee is hot but not smoking, add cumin seeds. Fry for few seconds until fragrant and the cumin turns few shades darker. Be careful not to let it burn.
  4. Add washed rice, salt and stir few times and cook for about a minute. Add water and bring it to a boil.
  5. Once it comes to a boil, cover the pot with a tight lid, reduce heat to very low and let the rice cook undisturbed for 20 minutes.
  6. After 20 minutes, fluff up the rice and serve.
Note: After 20 minutes of cooking if there is still water in the pot, cook it for few more minutes covered till all water is evaporated.
After 20 minutes, if rice is undercooked, sprinkle some warm water, cover and let it cook for few more minutes.
You can also soak the rice for about 30 minutes before cooking and rice will be fluffier. If you decide to soak the rice, reduce the amount of water used during the cooking process.

Print this recipe >>

Saturday, February 4, 2012

Kachumber (Mixed Vegetable Salad)

Kachumber is a super quick salad that goes really well with most Indian curries. The sourness of this salad cuts down the richness most of the Indian curries have, so it is a good balance. There is no fixed recipe or type of vegetables to use for this dish. You can just make it with pretty much any vegetables you like. Below is the version I usually make.

Vegetables can be cut into small or chunkier pieces. I prefer the chunkier style. Sometimes, I add lime and salt before serving, but every now and then, I just serve lime wedges on the side with small salt bottle so that people can make it according to their taste.


Kachumber (Mixed Vegetable Salad)

Ingredients:
2 Persian cucumbers or cucumber of your choice – peeled, cut in half lengthwise and sliced
1 medium tomato – halved or quartered and sliced
1 small carrot – cut in half lengthwise and sliced
1 jalapeno – cut in half lengthwise and sliced thinly (adjust to taste)
3 to 4 sprigs of cilantro – roughly chopped
3 to 4 mint leaves – roughly chopped (optional)
1/2 to 1 fresh lime juice (adjust to taste)
Salt to taste

Directions:
  1. In a bowl, mix all the ingredients together and adjust according to taste and serve.
Print this recipe >>

    Turkey Seekh Kabab

    The weather in Southern California has been great lately. Mostly sunny and we even hit 80 degrees F past week. With this beautiful weather, of course BBQ came to my mind. When we BBQ, we usually go all-out grilling different types of meats and vegetables in one shot. BBQ for us is more of a feast then keeping it simple :). However, this time, I controlled my urge of making a feaster and just made some Seekh Kababs and Tandoori Chicken. It was quick and effortless for me since I don’t do the grilling part :).

    Seekh Kabab is a popular dish and there are many different variety and versions of this dish. I came across the video from VahChef few years back and tried few different techniques that he has mentioned in this video. They are all good but his method requires grinding meat on your own. Since I wanted it to be simpler and quicker, I came up with below version.


    Turkey Seekh Kabab

    Makes: 5 Kababs
    Preparation Time: 15 to 20 minutes
    Cooking Time: 10 to 15 minutes

    Ingredients:
    0.8 pound (364 grams) ground turkey
    1 tablespoon ginger – grated or finely chopped
    1 tablespoon garlic – crushed or finely chopped
    1 teaspoon chili powder (adjust to taste)
    1 teaspoon garam masala powder
    1 teaspoon coriander powder
    1/8 cup fried onion or shallots (I usually use readymade one)
    1/4 cup grated extra sharp cheddar or cheese of your choice
    1/4 cup loosely packed cilantro – finely chopped
    1 jalapeno or any green chili - finely chopped (adjust to taste)
    1/2 egg – lightly beaten
    Salt to taste
    Black pepper to taste
    5 BBQ bamboo skewers – soaked in water for 30 minutes wiped dry
    Oil Spray
    1 large yellow or white onion – cut into 1/4 inch thick rings
    Few red or green whole jalapenos for grilling

    Directions:
    1. In a bowl, combine all the ingredients and mix well. Divide the meat into 5 equal portions.
    2. Take one portion of meat and starting from the center of the skewer; wrap the meat around and shape it into a uniform cylinder shape (sausage shape) along the skewer leaving few inches empty from top and bottom. Place the shaped Kabob on a plate and continue with the rest of the meat.
    3. In a separate dish, place the onion rings in one layer and drizzle some olive oil or spray some oil on them. Sprinkle some salt and pepper. Turn the onions over and do the same thing with the other side.
    4. When ready to grill, spray some oil on an outdoor grill and grill the Kabobs, for few minutes until nicely browned rotating few times for even browning on all sides. Grill the onions and Jalapenos alongside while grilling the meat.
    5. Alternatively, if you want to make it indoors, use a griddle skillet or a plain skillet, spray some oil and cook over medium heat for 8 to 10 minutes or until the meat is cooked through, rotating few times for even browning. Grill the onions and Jalapenos on the same pan as well.
    Note: The meat needs to be free of moisture for making the kabobs. Dry the green chili and cilantro well before adding. If the mixture is mushy, add some bread crumbs to firm it up. If the meat is sticking too much to your hands, oil your hands while shaping them.

    Serving Suggestion:
    To serve as an appetizer: remove skewer, cut into half or 3 portions of each kabab and serve with lime wedges and green (cilantro) chutney.
    To serve as a meal: serve with Jeera Rice, Naan, Raita, Kachumber, grilled onions and grilled fresh chilies. If you don’t like your meals dry, serve some type of Indian curry along with it.

    Print this recipe >>

    Wednesday, February 1, 2012

    Vietnamese Spring Roll

    Few years back, a friend of mine made these for us and we all loved it. I have tried few store bought versions but I prefer the home-made ones. By making at home, you can add any type of vegetables you want and adjust flavor according to your taste. She gave me the recipes for the sauces but other than that, there is really no fixed recipe on variety of ingredients you choose. You can add as much or as little as you like.

    It is fun to make these especially when everyone get to roll on their own. Of course, you’re supposed to fill a little of each ingredient and not over stuff it so that you get a beautiful looking roll. But then again, the fun part for us comes from piling up as much filling as we like, to the extent that the rice wrapper can barely hold it and end up with more of a burrito looking rolls rather than spring rolls. :)


    Vietnamese Spring Roll

    Makes: 15 to 18 rolls
    Preparation Time: 30 to 40 minutes
    Cooking Time: 15 to 20 minutes

    Ingredients:
    1 (8 ounce) boneless skinless chicken breast – cut into 2” pieces
    18 medium shrimps – peeled and deveined
    4 tablespoons sweet chili sauce (divided), I use Mae Ploy brand
    4 cloves of garlic – crushed or finely chopped (divided)
    Oil spray
    5 ounces rice noodles – cooked according to package instructions
    1 whole romaine lettuce – cut few inches from bottom and separate leaves
    1 carrot – cut into match stick size pieces
    2 Persian cucumbers or cucumber of your choice - cut into match stick size pieces
    5 green onions – cut into 3 equal parts
    1 cup loosely packed mint leaves
    1/2 cup cilantro – chopped (optional)
    1 Jalapeño or Serrano - cut into match stick size pieces (optional)
    15 to 18 dry rice papers
    Asian Chili Garlic Sauce
    Serve with Peanut sauce or Spring roll dipping sauce or both (recipes follow)

    Directions:
    1. In a bowl, combine chicken, 2 tablespoons of sweet chili sauce and 2 cloves of crushed garlic.
    2. Heat a skillet over medium heat and spray with some oil. Panfry the chicken pieces for few minutes per side until lightly browned and cooked through. Transfer to a plate and let it cool. Once it is cool, slice it into small strips.
    3. In a separate bowl, combine shrimp with remaining sweet chili sauce and garlic.
    4. Wipe the same skillet and spray it with some more oil. Heat over high heat and add shrimp. Sauté on high heat for few minutes until cooked through. Transfer to a plate and let it cool. Once it is cool, split the shrimp in half horizontally.
    How to Serve:
    1. Fill a large bowl or wide opening pot with few inches of hot tap water.
    2. Dip a rice paper sheet in the water for few seconds. Remove and place it on a plate (preferably, ceramic or glass plate)
    3. Place vegetables, noodle, chicken and shrimps to your preference in bottom 2/3 of the rice paper.
    4. Fold the bottom over, fold in the sides and roll to form a tight spring roll.
    5. Dip with peanut sauce or Spring roll dipping sauce.
    Note: I sometimes like to add the peanut sauce and Asian Chili Garlic Sauce while wrapping the spring rolls. Or, sometimes, I leave out all the sauces while wrapping and later dip it with Spring roll dipping sauce while eating.

    Peanut sauce
    Ingredients:
    1/2 cup peanut butter
    3 tablespoons Hoisin sauce
    2 teaspoons Asian Chili Garlic Sauce (adjust to taste)
    1 teaspoon preserved tofu (optional)
    3/4 cup chicken stock or water (divided)

    Directions:
    1. In a microwave safe bowl, combine all ingredients for Peanut sauce with 1/2 cup of chicken stock and microwave on high for 1 minute.
    2. Add the remaining 1/4 cup of chicken stock and stir well to combine.
    3. Microwave for 1 more minute and mix it well until it is smooth and creamy. Adjust according to taste and desired sauce consistency.
    Note: Sauce will get thicker once cool.

    Spring roll dipping sauce
    Ingredients:
    1 red jalapeno pepper – seeds removed and finely chopped
    2 cloves garlic – finely chopped
    4 tablespoons fish sauce
    2 1/2 tablespoons fresh lime juice
    2 teaspoon sugar
    1/2 cup water

    Directions:
    1. Combine all ingredients in a bowl and stir well till sugar is dissolved. Adjust according to taste and serve.
    Print this recipe >>