Thursday, December 22, 2011

Tawa Boti

Tawa Boti is a specialty dish of my mom. She used to make this for us every now and then. It is always served with freshly made chapati and it is one of my favorite dishes of childhood. Although I’ve cooked this dish many times and did improve over time, I’m still not able to make it as good as hers. Nonetheless, it is still a tasty dish and I enjoy eating it.


Tawa Boti

Serves: 4
Preparation Time: 20 to 30 minutes
Cooking Time: 30 minutes
Marinating Time: 30 minutes to overnight

Ingredients:
For Marinate:
1 lb bone in or boneless chicken – cut into bite size pieces
2 inches of ginger – grated or finely chopped
7 cloves of garlic – pressed or finely chopped
3 Thai chilies or any green chili – minced or finely chopped (adjust to taste)
1/2 teaspoon turmeric powder
1 teaspoon red chili powder
1 teaspoon cumin powder
1/2 teaspoon Garam Masala powder
1/3 cup plain yogurt
Salt to taste

Other ingredients:
2 tablespoon ghee (clarified butter) or butter
1 medium onion – finely chopped
1 medium onion – cut into 1/4 inch rings
1 large or 2 medium tomato – cut into 1/4 inch circles
Salt to taste
3 Thai chilies or any green chili – slit it lengthwise while stems intact, for garnishing
1/4 cup loosely packed mint leaves for garnish
1/2 teaspoon Garam Masala powder for garnish

Directions:
  1. Mix all the marinate ingredients and let chicken marinate for 30 minutes to overnight.
  2. In a large skillet, heat ghee on medium high heat. Add chopped onions, pinch of salt and sauté for few minutes until onions are lightly golden brown.
  3. Add marinated chicken, stir well, cover the pot and cook for a minute or so to brown the chicken. Cook for few more minutes covered, stirring occasionally so that chicken is browned on all sides.
  4. Once brown, reduce heat to low, add couple tablespoons of water, if needed, cover and cook until chicken is cooked through, for about 15 to 20 minutes.  
  5. Increase heat to medium and add onion rings, cover the pot again and cook for about 5 minutes.
  6. When onion is almost wilted, add tomato, cover and cook for further 2 to 3 minutes until tomatoes are slightly soft. Taste and add salt if required.
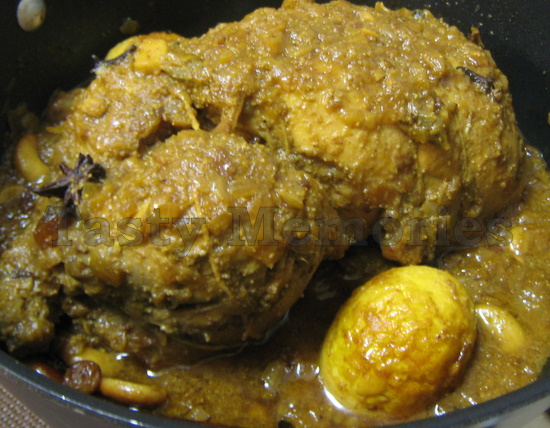
  7. Garnish with green chilies, mint leave and sprinkle Garam Masala powder. Cover the pot immediately and let sit for a minute before serving.
  8. Stir once and serve hot with Chapati, Naan or Paratha.
Print this recipe >>

Wednesday, December 21, 2011

Black Forest Cake


Every year, Black Forest cake is the only cake that my husband, Yogesh request as his Birthday cake. This cake reminds him of the cake he used to eat back in Bangalore. It is very light, airy and can be very chocolaty delicious, if topped with chocolate shavings. First, I start out with a chocolate sponge cake from Joyofbaking.com, then, fill it up with some whipped cream and Morello cherries and top it up with more whip cream.  I got my cherries from Trader Joe’s.

I usually put a lot of chocolate shavings on top and side of the cake but this year, I wanted to try something new. I have always wanted to make a little forest decoration for this cake for a very long time now but couldn’t really think of what to use to make the forest trees. I was surfing around and found the technique of piping melted chocolate to create shapes and writing words. The three dimensional trees that I was planning to make didn’t exactly turn out well on the day of baking, and since I was short with time, I just piped some two dimensional trees that I found while surfing.

I usually make one batch, 2 layers cake but this year, I made two batches and created a 4 layer cake. Of course working in different batches is a little more time consuming but if you’re going to make it only once a year, it is worth every minute.


Black Forest Cake

Makes: One 2 layer cake
Preparation Time: 2 hours
Baking Time: 15 to 18 minutes

Ingredients:
Cherries:
8 ounces of Morello Cherries in syrup (1/3 of the 24 ounce bottle)
1 tablespoon Kirsch or Cherry Brandy - optional
1 teaspoon granulated white sugar

Cake:
6 large eggs – yolks and whites separated while still cold
4 ounces Hershey’s Special Dark chocolate – chopped
1/4 cup minus 1 tablespoon granulated white sugar
1/2 teaspoon pure vanilla extract
3/4 teaspoon cream of tartar
2 tablespoons granulated white sugar
Oil spray or butter for cake pans
Flour for dusting cake pans

Whipped Cream:
1 3/4 cup heavy whipping cream
1/2 cup Mascarpone cheese
1/3 cup powdered sugar

Directions:
For Cherries:
  1. Drain the cherries in a bowl, reserving the liquid. Cut the cherries in half or quarters and keep aside.
  2. Add the reserved liquid along with Kirsch and sugar in a small saucepan and bring to a boil on medium heat.
  3. Once boil, reduce heat to low and let simmer for about 10 to 15 minutes. The liquid will still be runny but it is ok since we will be brushing it on the sponge cake. Turn off the heat and pour this liquid over the cherries and let cool.
For Cake:
  1. Preheat oven to 350 degrees F
  2. While the eggs are still cold, separate the egg whites from egg yolks in two separate bowls. Cover loosely with plastic wrap and keep at room temperature for about 30 minutes.
  3. Meanwhile, cut 2 circles of parchment paper to fit the bottom of a 9” round cake pan. Cut 2 additional long strips to cover the sides of the pan.
  4. Take two 9” round cake pans and spray them with Pam or butter them. Line them with the precut parchment papers on bottom and sides of the pan. Spray with more Pam oil or butter them and dust with some flour. Set these aside.
  5. Place chopped chocolate in a stainless steel bowl and place this over a pot of simmering water. Stir continuously until the chocolate melts and keep this aside.
  6. With stand mixer or hand mixer, beat the egg yolks with 1/4 cup less 1 tablespoon sugar until light and fluffy, for about 5 minutes.  Add vanilla extract and melted chocolate and beat to combine. Keep this aside.
  7. In a separate stainless steel bowl, with whisk attachment, beat the egg whites until foamy on medium low speed.
  8. Add cream of tartar and beat until soft peak forms on medium high speed.
  9. While continuing to beat, gradually add 2 tablespoon of sugar and beat until stiff peak forms.
  10. Take small amount of egg whites and fold it into the egg yolk mixture using a rubber spatula to lighten up the batter.
  11. Fold the remaining egg whites in two batches to the egg yolk mixture and fold just until incorporated. Do not over mix or the batter will deflate.
  12. Divide the batter equally into the prepared cake pans. Spread evenly with the spatula.
  13. Bake for about 15 to 18 minutes until the cake is puffed and lost its shine.
  14. Remove from oven and place it on a wire rack to cool. Loosely cover it with a clean damp paper towel.
For Whipped Cream:
  1. In a large bowl, with whisk attachment beat the heavy whipping cream and mascarpone cheese until soft peak forms.
  2. Gradually add powdered sugar and continue to beat just until stiff peak forms. Be careful not to overbeat the cream. Use the cream right away.
Assembly:
  1. Place a layer of cake on a platter. Brush it lightly with the liquid from the cherries. Use about 1 to 2 tablespoons of the liquid.
  2. Spread some whipped cream on the cake and sprinkle the cherries.
  3. Place another layer of the cake on top and brush lightly with the liquid from the cherries.
  4. Spread whipped cream on top and sides of the cake, to cover the whole cake.
  5. Decorate with some whole cherries and shaved dark chocolate or shapes made out of piped chocolate.
Note:
  • This recipe is for 2 layer cake. For a four layer cake, double the recipe.
  • To pipe chocolate, follow this method 1 for tempering chocolate. Place melted chocolate in a Ziploc bag, cut a small hole on one corner and pipe desired shapes on parchment paper. Chill in fridge for 10 to 15 minutes for chocolate to harden and is ready to use.
Print this recipe >>

Monday, December 19, 2011

Bell Pepper with Ground Meat

This is one dish that my sister used to make for us often. It is quick, easy, simple and delicious. Whenever I’m little tired to cook and if I have bell peppers on hand, I like to make this dish. It is a quick stir fry dish but, she uses fish sauce instead of soy/soya sauce and which sets this dish apart from other stir fry dishes. You can either use ground beef or turkey but I usually make it with turkey.


Bell Pepper with Ground Meat

Serves: 2 to 4
Preparation Time: 15 minutes
Cooking Time: 10 minutes

Ingredients:
1 tablespoon oil
9 to 10 cloves of garlic – whack with knife
1 medium onion – 1/4 of it finely chopped and 3/4 of it cut in chunks
1 lb ground turkey or beef
1 large or 2 small bell peppers green or mixed – cut in 3/4 inch squares
Fish sauce to taste
Black pepper to taste

Directions:

  1. Heat a wok or a wide frying pan over high heat and add oil.
  2. Once the oil is hot, add garlic and quickly stir for few seconds. Add chopped onions and continue to stir for about a minute until onions are translucent.
  3. Add ground meat, stir and break the meat chunks apart. Continue to cook for about 5 minutes or until the meat is cooked through and almost all the water has evaporated.
  4. At this point, add the onion chunks and continue to cook for another minute.
  5. Add bell peppers, stir and season it with fish sauce and cook for another minute or so. Do not overcook the bell peppers.
  6. Crack some black pepper, stir once and serve hot with steam rice and hot sauce of your choice.
Print this recipe >>

Saturday, December 17, 2011

Mini Cheesecakes

I was never interested in making cheesecakes in the past because it is not one of the desserts I like to eat. However, many people around me love cheesecakes. I made these mini cheesecakes for a get-together party from work and everyone seemed to love it.

I’m still new to baking cakes and desserts but I have found one very good website that I often refer to. I’ve tried few recipes and all of them have turned out pretty well so far. The only change I make to the original recipes is reducing the amount of sugar used since I do not like my deserts to be very sweet.

These mini cheesecakes are fun and easy to make and they are very adorable. I’ve made 2 batches with few different toppings but if you just choose one same topping for the whole batch, it wouldn’t be too much of work.


Mini Cheesecakes

Makes: 12
Preparation Time: 15 to 20 minutes
Baking Time: 18 to 22 minutes

Ingredients:
Crust:
1 cup (100 grams) graham cracker, original or chocolate flavor – grind into coarse crumbs
1 tablespoon granulated white sugar
4 - 5 tablespoons butter – melted

Filling:
2 - 8 ounce packages of full fat cream cheese – room temperature
2/3 cup minus 2 tablespoons granulated white sugar
1/8 teaspoon salt
2 large eggs – room temperature
1 teaspoon pure vanilla extract
1/2 teaspoon grated lemon zest
1/2 cup sour cream – room temperature

Directions:
  1. Preheat oven to 300 degrees F.
  2. Line 12 muffin cups with paper liners and set aside.
  3. In a bowl, combine graham cracker crumbs, sugar and melted butter. Divide this among the 12 muffin cups. Using the back of a cup or a glass, press the crumbs down so that they stick together and form a crust. Cover and refrigerate while preparing the filling.
  4. With stand mixer or handheld mixer, beat the cream mixture on slow speed until smooth. Add sugar and salt and beat to combine, scrape down the sides as necessary.
  5. Add eggs, one at a time and continue to beat until well blended. Add vanilla extract, lemon zest and sour cream and beat till combined.
  6. Divide the filling equally among the prepared muffin cups.
  7. Bake for 18 to 22 minutes or until firm. The center of the cheesecakes should still be a little wobbly.
  8. Remove from oven and place the tray on a wire rack to cool. One cool, cover with plastic wrap and refrigerate for few hours or overnight.
  9. Remove the paper liners before serving and top it up with fresh berries, dusting of cocoa powder, drizzling with berry sauce or melted chocolate. Store covered in fridge for several days.
Topping Ideas:

Dark and white chocolate topping:
1/3 cup heavy whipping cream
3 ounces Hershey’s Special Dark chocolate
1 teaspoon granulated white sugar (optional)
2 ounces white chocolate

Directions:
  1. In a heavy bottom pot over low heat, combine cream, chocolate and sugar (if using), and stir until chocolate is melted and the mixture is smooth and uniform in color. Keep it aside to cool a little.
  2. In a microwave safe bowl, melt white chocolate in few seconds interval stirring at every interval. Place this in a small Ziploc bag and cut off the bottom corner of the bag to create a small opening so that the chocolate can be piped onto the cheesecakes.
  3. Pour a spoonful of dark chocolate mixture over the cheesecake, and pipe patterns with white chocolate. Dark chocolate mixture can also be piped to create patterns.
  4. Refrigerate cheesecakes for few hours before serving. 
  
Lemon curd topping: (Adapted from JoyofBaking.com)
1 1/2 large egg
1/3 cup granulated white sugar
1/6 cup fresh lemon juice- about juice from one lemon
1 tablespoon unsalted butter –cut into small pieces and at room temperature
Zest of 1 lemon

Directions:
  1. In a stainless steel bowl whisk together the egg, sugar and lemon juice until blended. Place the bowl over a pot of simmering water and cook whisking constantly until the mixture becomes thick (160 degrees F), for about 5 minutes. It will thicken more when cooled.
  2. Remove from heat and strain through a fine strainer to remove any lumps. Add butter and mix till melted. Add lemon zest and mix well.
  3. Cover with plastic wrap directly on the lemon curd to prevent the skin formation and let cool. Once cool, refrigerate for few hours until ready to use. The lemon curd can be refrigerated for up to a week.
 Note: I left out lemon zest in the cheesecake filling to be used with this topping.


Raspberry sauce topping
A handful of fresh raspberries
Sugar to taste

Directions:
  1. Cook raspberries and sugar in a small pot over medium heat until raspberries are broken down. Cook until desire consistency. Strain through a strainer to remove seeds. Let cool before using.
  2. Spoon over or pipe the sauce over the cheesecakes.
Print this recipe >>

Chicken Korma

Chicken Korma is an easy and delicious dish. This is a dry version that my mom used to make and is usually paired with Dal, rice and some vegetables. Traditionally, it is made with good amount of oil and because of the amount of oil used; this dish can be kept in room temperature for about a day. It can be served warm or room temperature, so it is a good dish for picnics, the Burmese way.

It is good to use bone-in chicken as it will taste better, but boneless chicken will work as well. Dark or white meat of the chicken will depend on your preference. Because it is cooked on low heat, the chicken is quite tender.


Chicken Korma

Serves: 2 – 3
Preparation Time: 10 minutes
Cooking Time: 30 to 40 minutes

Ingredients:
1 lb bone-in chicken – cut in big chunks
1 tablespoon ginger – grated or finely chopped
1 tablespoon garlic – crushed or finely chopped
1/2 teaspoon turmeric powder
1 teaspoon white vinegar
2 tablespoon oil
Whole spices – 2” cinnamon, 4 cardamom, 3 cloves, 1 star anise, 1 big bay leave, 4 peppercorns
Salt to taste
Ground black pepper to taste
2 tablespoons water

Directions:

  1. In a pot, combine all ingredients and mix well.
  2. Cover the pot with lid and cook on very low heat.
  3. Chicken will produce enough water on its own.  Cook until all water has evaporated and chicken has cooked through.
  4. Serve with Dal and steam rice.
Print this recipe >>

Wednesday, December 14, 2011

Ras Malai

Ras Malai is my all time favorite desert. While growing up, we didn’t get to eat this as often, since there are not many places back in Burma that sells this desert during those days. I always thought it would be very difficult to make until I found these two recipes from Vah Chef and Manjula’s Kitchen and came up with below recipe.


Ras Malai

Makes: 12 pieces
Preparation Time: 15 minutes
Cooking Time: 1 hour
Inactive Time: 1 hour

Ingredients:
For milk patties:
4 cups whole milk
1/4 cup white vinegar or lime juice
8 to 12 ice cubes
1 1/2 cups sugar
9 cups water

For milk mixture:
4 cups whole milk
2 1/2 tablespoons of sugar (adjust to your taste)
4 cardamom pods
1 teaspoon Rose water (optional)
2 tablespoons chopped almonds and pistachios to garnish

Directions:
Paneer Patties:

  1. In a heavy bottom pot over medium high heat, boil 4 cups of milk stirring frequently to prevent scorching at the bottom of the pot.
  2. Once it comes to a boil, reduce heat to low and add vinegar or lime slowly, stirring gently and within few seconds, the milk solids will start to separate from whey.  Once the whey is clear, turn of the heat, remove from stove and add ice cubes.  This will create soft paneer (milk solids).
  3. Once the ice melts, drain the whey using a strainer lined with cheesecloth or muslin cloth.
  4. Run this under cold tab water to wash out the sourness. Gather all sides of the cloth to form a little bundle and squeeze excess water out. Hang this bundle for about an hour.  
  5. After an hour, in a large pot, bring 1 1/2 cups of sugar and 9 cups of water to a boil over high heat. Make sure the pot is large enough to accommodate the finished patties, as they will expand to about double in size.
  6. While the sugar water is boiling, place paneer on a dry clean surface and knead for 3 to 4 minutes until the hands get little greasy and it comes together as soft smooth dough.
  7. Divide the dough into 12 equal parts and roll by applying some pressure initially and releasing the pressure to create round smooth balls. Press the ball slightly to flatten just a bit. Use very little pressure; you don’t want to shape them into flat disk.
  8. Drop the paneer balls into the boiling sugar water, cover and cook for 12 to 15 minutes on high heat.
  9. Transfer the patties along with some syrup to a large bowl and let it cool. Take out the patties from the syrup and squeeze them lightly, and keep aside.
Milk Mixture:
  1. While sugar water is boiling, in a separate heavy bottom pot, bring the remaining milk along with cardamom pods to a boil on medium heat. Once it comes to a boil, reduce heat to low and simmer for about 20 minutes stirring frequently to prevent scorching.
  2. Add sugar to taste and add Rose water, if using and mix well.
  3. Add the patties in milk and cook for 1 minute or so.
  4. Turn off the heat and transfer the patties along with milk mixture to a bowl or container, and garnish with chopped almonds and pistachios. Let cool completely and refrigerate for at least 2 hours or overnight before serving.  Serve chill.
Print this recipe >>

Tuesday, December 13, 2011

Chili Chicken

Chili Chicken is a pretty common Indo-Chinese dish in India. I’m not very familiar with the Indo-Chinese food but since my husband is from India, he likes the Chinese food made there. Since I’ve never tasted before either, I just have to go with the online versions of this dish. This is one of the recipes of VahChef that I found few years back while exploring new cuisines. I often refer to his recipes for Indian Cuisine.

Most of the recipes call for deep frying the chicken first, and then stir fry the vegetables and combine the two. As much as I love deep fried food, when it comes to frying at home, I try to avoid it as much as possible. This is mainly because I don’t enjoy the frying process and also because of the amount of oil that gets wasted. Of course, the deep fried chicken will have much better texture with a crunch, so experiment and play with it to see which one you prefer. This recipe is a stir fry version, which is much healthier and I believe is a good compromise.


Chili Chicken

Serves: 4
Preparation Time: 20 to 25 minutes
Cooking Time: 15 minutes

Ingredients:
For marinate:
1 lb skinless boneless chicken breast or thigh – cut into bite size pieces
2 tablespoons corn flour
1 egg
1 teaspoon light soy/soya sauce
Salt and black pepper to taste

Other Ingredients:
3 tablespoons oil (divided)
1/4 cup cashew nuts
10 dry red chilies – cut in half and seeds removed (adjust to taste)
1 inch ginger – grated or finely chopped
5 to 6 cloves of garlic – crushed or finely chopped
1 medium onion – cut in 1 inch cubes
2 cups mixture of green, red and orange bell peppers or 1 green bell pepper – cut into 1 inch squares
1 celery stalk – roughly chopped
1 green onion – thinly sliced
Black pepper to taste
1 teaspoon red chili powder (optional)
3 tablespoons light soy/soya sauce
2 teaspoon Asian chili garlic sauce (adjust to taste)
1 teaspoon sugar
1 to 1 1/2 cup water or chicken stock
1 tablespoon white vinegar
Salt to taste
1 tablespoon of corn flour mixed with 3 tablespoons of water
1/2 teaspoon sesame oil
Few sprigs of cilantro – roughly chopped for garnishing

Directions:
  1. In a bowl, combine chicken with all marinate ingredients, mix well and keep aside while preparing other ingredients.
  2. In a large skillet, heat 1 tbsp of oil over medium heat and fry cashew nuts for few minutes until lightly golden brown.  Remove from oil and keep aside.
  3. In the same skillet, add 1 more tbsp of oil and heat it over high heat. Once hot, add chicken, spread it around and let stand for a minute or so. After a minute, stir chicken and cook for few more minutes until lightly golden in color and almost cooked through. Transfer chicken to a plate and set aside.
  4. Have all ingredients ready as stir frying goes pretty quick. Heat the same skillet with remaining 1 tbsp of oil over high heat. Add the dry red chili and stir. Add ginger, garlic and stir for few seconds.
  5. Add onion stir few times and cook for a minute.
  6. Add bell peppers, celery and green onion and stir.
  7. Season with pepper and add chili powder, soy/soya sauce, chili garlic sauce, sugar and stir well.
  8. Add water, vinegar and chicken and mix well. Season it with salt if necessary.
  9. Add prepared corn flour liquid 1 tbsp at a time adjusting to the desire thickness of the gravy.
  10. Add sesame oil, fried cashew nuts, stir once and garnish with cilantro.
  11. Serve hot with steam rice.
Print this recipe >>

Simple Crusty Bread

This was probably one of my very first breads I tried making few years back. This recipe is adapted from NY Times. It is pretty simple but does require some dough rising time.  This dough does not require kneading but since the dough is quite soft, it does need a little patience to work it.


Simple Crusty Bread

Makes: 4 loaves
Preparation Time: 30 minutes
Baking Time: 30 minutes
Resting and Rising Time: 3 hours or more

Ingredients:
1 1/2 tablespoons active dry yeast
3 cups of lukewarm water (105 to 115 degrees F)
1 tablespoon sugar
6 1/2 cups unbleached all purpose flour plus more for dusting
1 1/2 tablespoons kosher salt
Cornmeal for dusting
1 cup hot water for baking

Directions:

  1. In a large bowl or pot, combine yeast, water and sugar. Mix well and set aside for 5 to 10 minutes.
  2. Once the yeast is foamy, sift flour and salt into the yeast mixture. Mix well until there are no dry patches with a wooden spatula.
  3. Loosely cover with plastic and let rise in a warm spot or room temperature for 2 hours.
  4. Sprinkle cornmeal over pizza peel and set this aside.
  5. After 2 hours, punch the dough down. Sprinkle some flour on top and with a sharp knife; divide the dough into 4 equal portions.
  6. With well floured hands, take each portion of the dough and try to shape as round on the top as possible by stretching and gathering the dough to the bottom.  Place this on the prepared pizza peel. Do the same with the remaining 3 dough and let rest for 40 minutes.
  7. Place a broiler pan in the bottom rack and pizza stone in the middle rack of the oven and turn on the oven to 450 degrees F. Let it heat for at least 20 minutes.
  8. Once the dough has been rested for 40 minutes, sprinkle little flour and slash the top 3 times with very sharp knife. Transfer onto the stone. Pour 1 cup of hot water into the broiler pan and close the oven door quickly to trap the steam. Bake for about 30 minutes or until golden brown on top.
  9. Remove from oven and transfer to wire rack and cool completely.
Note:
  • Sliding all 4 dough from pizza peel to the stone is difficult. Remove the stone from the oven and transfer one at a time. Take one dough, reshape it a little and drop it onto the stone. 
  • Be very careful and wear an oven mitt while pouring hot water into the broiler pan.
Print this recipe >>

Monday, December 12, 2011

Broccoli Cheese Soup

Few years back, I found this Broccoli Cheese Soup online and ever since then, this has been one of our favorite soups. Since the weather is getting colder, it is a perfect time for a warm bowl of soup. It is rich, creamy and quite filling when paired with some crusty bread to be dipped with.


Broccoli Cheese Soup

Serves: 4
Preparation Time: 15 minutes
Cooking Time: 1 hour

Ingredients:
1/4 cup butter plus 1 tablespoon for cooking onions
1/2 medium onion – finely chopped
1/4 cup all purpose flour
2 cups half-and-half
2 cups chicken or vegetable stock
3/4 lb fresh broccoli – cut into small chunks
1 cup carrot - roughly chopped
Salt to taste
Black pepper to taste
8 ounces sharp cheddar - grated
Chopped parsley for garnish

Directions:
  1. In a pot, melt 1 tbsp of butter over medium heat; add onion and sauté for few minutes until onions are translucent. Remove from the pot and set aside.
  2. In the same pot, over medium heat, melt 1/4 cup of butter. Add flour and whisk for few minutes until flour is lightly golden color.
  3. Slowly add half-and-half, whisking constantly to prevent lumps. Add the chicken stock and bring to a boil stirring often and reduce heat to low. Simmer for about 15 minutes.
  4. Add broccoli, carrot and onion and cook over low heat until the vegetables are tender, about 15 to 20 minutes.
  5. Add salt and pepper to taste. Use a blender or hand blender and blend the soup to your desire consistency. If using a blender, let cool a little and blend in separate batches.
  6. Return the pot over low heat to heat it up and add grated cheddar and stir until cheese is melted. Garnish with parsley and serve in a bread bowl or with slices of bread on the side.
Print this recipe >>

Saturday, December 10, 2011

Red Onion Salad

This is a quick salad and taste best the same day. Goes really well with rich Indian curries and Kheema Paratha (Flat bread stuffed with minced meat)


Red onion salad

Ingredients:
1/2 red onion – very thinly sliced
1 Jalapeno or Serrano - very thinly sliced (adjust to taste)
2 tablespoons of white vinegar
Salt to taste

Directions:
  1. In a bowl, mix all the ingredients well and let sit for 5 to 10 minutes and serve. 
Print this recipe >>

Falooda

Falooda is one of the favorite drinks we grew up with. There are different versions in different countries but below is the version we make back home in Burma. Although we don’t use rose syrup (mostly because we don’t get it there) I’m using it here because it is easier to make and I like the taste of it. In USA, you can easily get rose syrup in Indian or Pakistani stores. Back home, we use liquid rose essence, sugar and red food coloring instead of the rose syrup.

This is a fun drink for kids because while serving, they can add any ingredients they like, as much as they like making it to their taste. It is served chilled so prepare ahead of time.


Falooda

Makes: 2 very tall glasses or 4 regular glasses
Cooking Time: 40 minutes
Preparation Time: 5 to 10 minutes
Chill for 2 to 4 hours

Ingredients:
4 cups whole milk
6 tablespoons rose syrup (if not available, Rose essence, red food color and sugar can be used to replace this)
Half of 7 gram packet of red or green Agar Agar powder (I use Swallow Globe brand from Asian Market)
1/4 cup small sago or tapioca pearls – colored or white
3 teaspoon basil seeds
Vanilla or strawberry ice cream

Directions:
Milk
In a heavy bottom pot, bring milk to a boil. Reduce heat to low and simmer for about 20 to 30 minutes stirring often to make sure that milk is not scorching at the bottom.  At this point, if using rose syrup, add little at a time and adjust according to taste.  If you don’t have rose syrup, add rose essence, sugar to taste and red food coloring for milk to be light pink.  Prepare milk a little sweeter than your taste since other ingredients are sugarless.  Turn of the heat, let the milk cool and chill in fridge.
Agar Agar
While the milk is boiling, in a separate pot, combine 450 ml of water and 1/2 packet of Agar Agar powder. Bring this to a boil over medium heat and pour the mixture into a bowl or a container, let it cool and chill in fridge to set. Before serving, cut it into match stick size pieces.
Sago
In a pot, bring about 6 cups of water to a boil and add sago pearls. Stir and reduce heat to medium low and cook for 5 to 6 minutes on half covered pot, stirring occasionally. Sago will turn transparent when cooked.  Drain and rinse with cold water and keep aside.
Basil Seeds
In a bowl, combine basil seeds with about 2 cups of water and keep aside till ready to serve.  It will take about 10 minutes to fully expend.  Drain water before using.

How to Serve:
Individual serving: Take a tall glass and add prepared agar agar, sago, basil seeds and pour milk 3/4 full. Add some ice and top it up with a scoop of ice cream.

Serving to a crowd: In a pot, mix all prepared ingredients with milk except for ice cream. Pour the milk mixture in serving glasses, add some ice and top it up with a scoop of ice cream.

Note: Lod Chong (Tapioca noodles) can also be added. Most of the Asian grocery stores have ready to use Lod Chong. If using dried version, boil per packet instructions. This is not a traditional ingredient but some people like to add this to Falooda.
Print this recipe >>

Chicken Lettuce Wrap

I love chicken lettuce wraps. Few years back, we tried this in one of the restaurants and ever since then, I have been making it at home. Although it is an appetizer, I like to serve it as a light meal with steam rice. We usually take the lettuce, top it up with rice, chicken and pour some sauce, wrap it up and eat. Below recipe is adapted from Rachel Ray’s, Barbecued Chinese Chicken Lettuce Wrap.


Chicken Lettuce Wrap

Serves:  2 - 4
Preparation Time: 30 minutes
Cooking Time: 10 minutes

Ingredients:
For Spicy Peanut Sauce :
1/4 cup peanut butter
1/4 cup hot water
1/2 tablespoon soy/soya sauce
1 tablespoon fresh lime juice
1 tablespoon Asian chili garlic sauce (adjust to taste)
1/2 tablespoon dark brown sugar
1 clove garlic - crushed
1tablespoon fresh cilantro - chopped
1 green onion – thinly sliced

For Lettuce Wrap:
2 tablespoons oil
3 cloves of garlic – crushed -divided
1 lb skinless boneless chicken breast – cut into very small pieces
12 to 15 fresh shitake mushrooms – stems removed and thinly sliced – about 2 1/2 cups
Salt to taste
Black pepper to taste
1 inch ginger – grated – about 1 teaspoon
1 orange zest
1 small red bell pepper – diced small – about 1 cup
3 tablespoons Hoisin sauce
3 green onion – thinly sliced
1 iceberg lettuce – quartered
2 oranges – cut out the segments and reserve the core

Directions:
  1. In a bowl, whisk peanut butter and hot water together. Add the remaining ingredients for the sauce and mix well to combine. Add more water if needed and keep this aside.
  2. Heat a skillet on high heat and add oil. Add half of the crushed garlic and stir for few seconds.
  3. Add chicken, stir and cook for a minute or two. Add mushrooms and cook for another two minutes.
  4. Add the rest of the garlic, ginger, a pinch of salt and pepper to taste. Stir few times and cook for about a minute.
  5. Next, add orange zest and red bell pepper and cook for further minute.
  6. Add Hoisin sauce, and squeeze out juice from the reserved orange cores into the pot. Mix well and cook a minute more. Turn off the heat and add green onions and stir.
  7. To serve, pile few spoonfuls of the chicken mixture on lettuce leaves, pour some peanut sauce and top it up with orange segments. Wrap and eat.
Print this recipe >>

Thursday, December 8, 2011

Pulau (Butter Lentil Rice)


Pulau (Butter Lentil Rice)

Serves: 4
Preparation Time: 5 minutes
Cooking Time: 30 minutes
Inactive Time: 4 to 6 hours

Ingredients:
1 cup Basmati rice
1/2 cup chana daal (split chickpea) – washed and soaked in water for 4 to 6 hrs
Salt to taste
1 teaspoon sugar
2 bay leaves
1 small 2” cinnamon stick
2 cup minus 2 tablespoon water
2 tablespoon evaporated milk or milk
1 tablespoon oil
1 tablespoon clarified butter (ghee) or butter
1 small or 1/2 medium onion – finely chopped
1 teaspoon of cumin seed (optional)

Directions:
Rice cooker method
  1. In a rice cooker pot, add rice and chana daal and wash couple times. Drain water and add salt, sugar, bay leaves, cinnamon, water, milk and mix well.
  2. In a skillet, heat butter and oil over medium high heat, add cumin seeds if using, and add onions. Fry for few minutes till onions are lightly brown.  Pour this over the rice pot, mix and cook the ricer in cooker till done.
Stovetop method
  1. Wash rice and chana daal together for couple times, drain water and keep aside.
  2. In a pot, heat butter and oil over medium high heat, add cumin seeds if using, and add whole spices and stir. Add onions and fry for few minutes till onions are lightly brown. 
  3. Add the washed rice and daal to the pot and cook for a minute or so. Add water, milk, salt and sugar and stir well to combine.
  4. Reduce heat to low, cover the pot and cook for 20 minutes. If water has not fully evaporated, continue to cook for few more minutes. Fluff the rice before serving.
*Note: After 20 minutes, if the rice is undercooked, sprinkle some warm water and continue to cook.

Print this recipe >>

Akha Murgi (Whole Chicken Curry)

Akha Murgi is a special occasion dish that I grew up eating. It is not a difficult dish to make but does require a little preparation. I got this recipe from my sister and this is my first time making it. It turned out better than expected. The chicken was falling apart tender and moist. The taste was little sweet and savory at the same time. This brings back good old memories.

Traditionally, it was cooked on stove top and heated charcoals were placed on top of the pot to give even heat from top and bottom. Dough from wheat flour is also used, to seal the edges of the pot so that it is air tight and no steam will escape. Technically, it is not a curry because it is prepared without much gravy. It is somewhat in between curry and a roast. I’ve made few changes by using oven for cooking, foil for sealing the pot and made it with a bit more gravy (more like curry) since I’m not preparing many other dishes to accompany this. Serve with some rice, naan and light salad.


Akha Murgi (Whole Chicken Curry)

Serves: 4
Preparation Time: 30 to 40 minutes
Cooking Time: 1 hour 30 minutes
Marinating Time: 2 hours to overnight

Ingredients:
1 whole skinless chicken – 3 to 4 lbs
1/2 lb baby potato – boiled - divided
3 eggs – boiled and shell removed -divided
Few drops of yellow food coloring
3 tablespoons of clarified butter (ghee) or butter -divided
3 tablespoons of oil -divided
1 1/2 to 2 medium onions – chopped
Whole spices (4 cardamom pods, 2” cinnamon stick, 2 bay leaves, 4 cloves, 1 star anise, 5 pepper corns)
3 tablespoons of raisins
3 tablespoons of whole cashew nuts

For marinate:
1 inch ginger – peeled and cut in pieces
9 cloves of garlic
4 Thai chilies or 1 Serrano pepper – roughly chopped (adjust to taste)
4 teaspoons cumin seeds – rinsed with water and drained
3 tablespoons white poppy seeds – lightly toasted
10-15 cashew nuts – grind to powder
Few drops of yellow food coloring or few strands of saffron soaked in 1 tbsp of water
1 tablespoon coriander powder
1 1/2 teaspoon garam masala powder
1/2 cup plain yogurt
1 teaspoon sugar
Salt to taste

Directions:
  1. Remove any innards from the chicken, rinse with cold water inside out and pat dry with paper towels. Poke the chicken gently with sharp knife in few places. Don’t over poke the chicken as it might fall apart when cooked. Just poke a little, here and there.
  2. In a food processor or blender grind ginger, garlic, chili, cumin and poppy seeds to a fine paste. Transfer the grinded paste to a big pot or container and add the remaining marinate ingredients and adjust according to taste.
  3. Add chicken to the marinate paste, rub all over inside and out with the marinate paste and let it marinate overnight or at least 2 hours in the fridge.
  4. When ready to cook, rub the boiled potatoes and boiled eggs with yellow color. Stuff, 2 to 3 of the potatoes and 1 boiled egg into the cavity of the marinated chicken.  Cross the chicken legs, tie with a string and tug the wings.  If there is chicken neck attached, tug it into the cavity. Tie the whole chicken with one long string, wrapping across few times starting from the legs all the way up to the wings. This will prevent the chicken from falling apart to pieces while cooking. Set this aside.
  5. Preheat oven to 350 degrees F.
  6. Heat an oven proof pot large enough to hold the chicken, on medium high heat and add 1 1/2 tbsp butter and 1 1/2 tbsp oil. When hot, add whole spices and stir. Add chopped onion and pinch of salt and stir. Continue to cook stirring occasionally until onions are slightly brown.
  7. Add the chicken along with marinate paste. Reduce heat to medium low, cover and cook for few minutes. Every few minutes, stir and flip the chicken few times. Do this for about 2 to three times.  If chicken it not oozing out any water, or if it is too dry, add little water.
  8. Once chicken is lightly browned on all sides, seal the pot with aluminum foil, cover with the lid and bake it in the preheated oven, for total 1 hour.
  9. Meanwhile, in a small skillet, heat the remaining 1 1/2 tbsp of butter and sauté raisins and cashew nuts on low heat until cashew nuts are light golden color. Remove from pan and drain on paper towel.
  10. In the same skillet, add the remaining 1 1/2 tbsp of oil and fry the remaining potatoes and 2 boiled eggs till golden brown on all sides. Drain on paper towel and keep aside.
  11. After 40 minutes of baking the chicken, remove from oven and add fried raisins, cashew nuts, potatoes and eggs to the pot. Stir once, seal and put back in the oven and continue cooking for the remaining 20 minutes.
  12. Serve with Naan or Paratha, Pulau (rice) and Salad.
Print this recipe >>

Wednesday, December 7, 2011

Panko Crusted Long Bean Fries

Not too long ago, while hanging out at Trader Sam’s Enchanted Tikki Bar in Downtown Disney, California, we discovered these delicious and addictive fried string beans. We love them so much that, we thought we should try making some at home. I fried the beans and my husband came up with this quick dipping sauce which was really tasty.


Panko Crusted Long Bean Fries

Serves:  4
Preparation Time: 5 minutes
Cooking Time: 30 minutes

Ingredients:
1 lb long beans – cut into 5 to 6 inch pieces
1 cup flour
2 teaspoons garlic powder
1 teaspoons onion powder
4 teaspoons paprika (divided)
1/2 cup milk
1 egg- lightly beaten
2 cups panko breadcrumbs
Salt to taste
Black pepper to taste
Oil for deep frying

Dipping Sauce:
3 tablespoon mayonnaise
3 tablespoon ketchup
Few dashes of hot sauce of your choice

Directions:
  1. In a small bowl, add all the dipping sauce ingredients, mix well, adjust according to taste and keep aside.
  2. Bring a pot of water to a boil on high heat. Add the cut long beans and blanch for 1 minute. After 1 minute, drain the long beans and immediately place them in a bowl of ice cold water to stop the cooking process. Set this aside.
  3. In one shallow dish, add flour, garlic powder, onion powder, 2 tsp paprika, salt and pepper and mix well.
  4. In a second dish or bowl, add milk, egg, 1 tsp paprika, salt and pepper and mix well.
  5. In a third dish, add panko breadcrumbs, 1 tsp paprika, salt and pepper and mix well.
  6. Heat the oil over medium high heat.
  7. Remove few beans from the water and shake off to remove excess water. Add them to the flour dish, and coat well with flour. Remove and drop them to the milk dish and coat well. Next, coat them with breadcrumbs and finally, add to the preheated oil and fry till golden brown.
  8. Drain on paper towels and serve with dipping sauce.   
Note: Fry in separate batches working with handful of beans at a time.

Print this recipe >>

Tuesday, December 6, 2011

Thai Duck Curry

If there is ready made or leftover roasted duck, this dish comes together fairly easy and quickly. You can either use a store bought can curry paste or make curry paste from scratch at home. Since I was short of time that day, I just used the can version, which was pretty tasty as well. I like this dish to be on a little sweeter side, so I added 2 tsp of sugar. Taste first before adding full 2 tsp.  This dish is creamy, little sweet and tangy from the pineapples and has a kick from all spices from the curry paste.  Overall, this is one of my husband’s favorite dishes.


Thai Duck Curry

Serves:  4
Prep Time:  15 minutes
Cooking Time: 15 minutes

Ingredients:
2 tablespoon oil
2 oz (1/2 a can) Maesri red curry paste
1 cup coconut milk
1/2 roasted duck – cut in chunks
1/2 cup pineapple – cut into bite size pieces
4 to 6 kaffir lime leaves – torn with hand
1/2 cup cherry tomatoes –cut in half
Fish sauce to taste
2 teaspoon sugar (adjust to taste)
1/2 cup Thai basil leaves

Directions:
  1. Heat a skillet over medium high heat. Add oil and sauté red curry paste for 1 min or so until fragrant.
  2. Add few tablespoons of coconut milk and stir. Add few more tablespoons of coconut milk until it becomes thick gravy consistency.
  3. Add the roasted duck, stir and cook for further minute.
  4. Add pineapple, kaffir lime leaves and cherry tomatoes. Season it with sugar and fish sauce to taste.  Stir well and cook for few more minutes.
  5. Add the rest of the coconut milk and some water to adjust the gravy consistency. Cook for further minute.
  6. Turn off the heat and add basil leaves. Stir once and transfer to a serving bowl. Garnish with few more basil leaves.
Print this recipe >>

Roast Duck

I’ve been craving for a good roast duck for some time now. I’ve made duck couple times in the past but haven’t been very satisfied with the results, until I found this Roast Duck recipe online. This recipe is a bit time consuming but you’ll get a really flavorful and crispy skin duck. I’ve added some spices for flavor. Leftover duck (if there’s any) can be made into Thai duck curry with red sauce and coconut milk.


Roast Duck

Serves: 4
Prep Time: 30 minutes
Cooking Time:    4 hours and 30 minutes   

Ingredients:
1 whole young duckling, 5-6 lbs
1/2 teaspoon cinnamon powder
1/2 teaspoon ginger powder
1/4 teaspoon white pepper powder
1/8 teaspoon cloves powder
1 tablespoon soy/soya sauce
1 celery stick – cut in big chunks
1 medium onion – quartered
Kosher salt

For Sweet & Spicy Glaze
1/3 cup honey
3 tablespoon orange juice
1 tablespoon light soy/soya sauce
1 1/2 Tablespoon Sriracha chili sauce (adjust to taste)

Directions:
  1. Preheat oven to 300 degrees F.
  2. Prepare the duck by removing all the innards from the cavity. Cut off the tail and any excess skin and discard. Rinse the duck inside and out and pat dry with paper towels.  Using a sharp knife, score diamond pattern onto the duck’s breast area, slicing through the skin and fat. Cut on an angle without cutting into the meat.  Pull out quills if any. Poke the duck all over with a sharp knife without going through the meat. 
  3. In a bowl, mix spice powders, cinnamon, ginger, white pepper and cloves. Sprinkle half of this inside the duck’s cavity. Add soy/soya sauce to the remaining spice mixture, mix well and rub all over the outside of the duck. 
  4. Stuff the duck with celery and onion, tie the legs and fold the wings under. Place the duck breast side up in a roasting pan mounted with rack, sprinkle some salt and roast for 1 hour.
  5. After first hour, poke the skin all over with a sharp knife, flip over so it is breast side down and roast in oven for 1 hour.
  6. After second hour, repeat the process, poke and turn the duck breast side up and roast for 1 more hour.
  7. After third hour, poke and turn the duck breast side down and roast for 1 more hour.
  8. While the duck is roasting for its last hour, make the glaze. In a medium size saucepan, combine all of the glaze ingredients and bring it to a simmer over medium-high heat. Whisk continuously for few minutes until it gets syrupy and coats the back of the spoon. Set this aside.
  9. After the fourth hour, remove the duck from the oven, and increase the oven temperature to 400 degrees F.  Flip the duck over so that it is breast side up. Once the oven temperature reaches 400 degrees F, put the duck back in and cook for 10 to 15 minutes.  At this point, the skin should be golden brown and crisp.
  10. Remove from oven and brush on with glaze all over. Put back in the oven and bake for another 5 to 7 minutes, keeping a close eye on it as it can burn easily at this point.  Let it rest, out of oven for 10 minutes before carving.
Print this recipe >>

Monday, December 5, 2011

Spice Rubbed Roast Turkey

Few years ago, I saw Rachael Ray making Pressed Herbs and Spices Turkey Breast on TV and ever since then, I have been wanting to try this recipe but never actually got a chance to do so. This year, I decided to give it a try, but instead of using just the turkey breast, I wanted to make a whole turkey for thanksgiving. I've never cooked whole turkey before but have heard enough stories of things that could go wrong, so I know that I need to research more on how to cook the bird without drying it out. I came across Alton Brown's Roast Turkey recipe which seems fairly easy and has many good reviews, so decided to give it a shot. I used both the recipes and came up with this below version.

I'm very pleased with this turkey recipe. It is a little lengthy process but worth every minute and effort, as it was probably the best turkey we've ever tasted.  It was very juicy, tender, tasty and at the same time, the skin was crisp and flavorful. For beginners like me, I would highly recommend the probe thermometer cause with this, you won't over or under cook the meat.  The only thing I would pay attention to is, when the turkey first goes in the oven at 500 degrees F, keep a close eye on it cause with spices, it will brown faster than the original recipe. I put a sheet of foil after 30 minutes of cooking since my bird was already browning enough and I didn't want more color on it. I'm looking forward to re-make this in near future.


Spice Rubbed Roast Turkey

Ingredients:
1 (10 to 15 lbs) fresh young turkey – if frozen, thawed

For the brine:
1 gallon vegetable stock
1 cup kosher salt
1/2 cup light brown sugar
1 tablespoon black peppercorns
1 1/2 teaspoon allspice berries
1/2 teaspoon crushed red pepper
3 sprigs of fresh thyme
A pinch of dry sage
1 gallon heavily iced water

For spice rub:
1 tablespoon Montreal Seasoning by McCormick
2 tablespoon ground cumin
2 tablespoon smoked paprika
2 tablespoon coriander powder

For herb and nut paste:
8 sprigs of fresh thyme – stems removed
1/2 cup cilantro
1 cup flat-leaf parsley
1 cup shelled unsalted pistachios

Other ingredients:
1 red apple – sliced
1/2 medium onion – sliced
1 cinnamon stick
1 cup water
4 sprigs of fresh rosemary
Oil to brush on turkey

One day before roasting:
  1. In a pot, combine vegetable stock, kosher salt, brown sugar, black peppercorns, allspice berries and bring it to a boil over medium high heat stirring occasionally. Turn of the heat and add crushed red pepper, fresh thyme and sage; and stir to combine. Let the brine cool completely and refrigerate to chill.
Night before roasting:
  1. Combine the brine and iced water in a large double layered trash bag set inside a foam ice box or a bucket large enough to hold whole turkey.
  2. Prepare turkey by removing all innards and rinse inside and out under cold water.
  3. Immerse the turkey breast side down in the brine and tie the trash bags if using any and weight it down if necessary.
  4. Refrigerate or keep it in a cool place for 8 to 16 hours, turning the turkey once half way through brining
When ready to roast:
  1. Preheat oven to 500 degrees F
  2. In a microwave safe bowl, combine apple, onion and cinnamon stick with 1 cup of water and microwave on high for 5 minutes. Let this cool a bit, drain and set aside.
  3. Prepare the spice rub by mixing all the spice rub ingredients in a bowl and set aside
  4. In a food processor, combine all the herb and nut paste ingredients and process into a paste and set aside
  5. Remove the turkey from the brine and rinse inside and out under cold water. Discard the brine liquid.
  6. Set the turkey on a roasting rack layered over roast pan and pat dry with paper towels.
  7. Loosen up the skin on the breast area with a sharp knife.  Stuff the herb and nut paste between the skin and the meat. Spread it evenly around both breasts area going as deep as you can without breaking the skin.
  8. In the turkey’s cavity, place the apple, onion and cinnamon mixture along with fresh rosemary.
  9. Coat the skin liberally with oil and sprinkle the spice rub mixture all over the bird.
  10. Tuck the wings underneath, tie the legs and roast it in the lowest rack of the oven for 25 - 30 minutes. Check once in between to make sure the skin is not burned.
  11. After 30 minutes, reduce the oven temperature to 350 degrees F. Insert the probe thermometer into the thickest part of the breast and set the thermometer alarm to 161 degrees F.  Put a sheet of foil on top to prevent the skin from burning and continue to cook until the internal temperature reaches to 161 degrees F.
  12. My 10 pound bird took me about 2 1/2 hours of roasting time.
  13. Once the bird is cooked, remove from oven, cover loosely with foil and let rest for 15 minutes before carving.
Print this recipe >>